Over Christmas, I expanded my home lab with another ESXi host. It seemed like the perfect time to set up Auto Deploy so my new host could be brought online with a minimum of effort. The process requires some assembly and I ran into a few minor issues along the way, so I thought I would detail those issues for others. The process is also quite lengthy, and this will be a multi-part series. Stay tuned, and check back at Auto Deploy Deep Dive Series for the rest of the articles. Credit goes to Vladan Seget’s Auto Deploy post and VMware’s own documentation for getting me started.
Auto Deploy requires multiple components – Image Builder, PowerCLI, Host Profiles, TFTP, DHCP, and vSphere Enterprise Plus licensing for your vCenter server. You have your choice of the TFTP and DHCP providers, the rest are provided by vCenter and VMware. For TFTP, I used SolarWinds’s TFTP server (you do not have to provide a valid email address to access the download) for Windows and ISC tftp for CentOS. I had an existing CentOS server running ISC DHCP; Windows DHCP server on Server 2003+ is fine but I skipped over it because it’s familiar to most and easy to pick up by the rest.
Before I begin, let me describe my home lab setup as it was on Christmas morn. It consisted of one existing ESXi host, a Dell PowerEdge T110 II called ‘esxi’ running v5.5. The existing (and relevant) VMs include the Windows Server 2012 Domain Controller VM (devdc01), Windows Server 2012 vCenter 5.5 VM (vcenter), and CentOS 6.4 VM providing DHCP services (server). I added the Auto Deploy and TFTP services to a new Windows 2008R2 VM so that the existing vCenter server was not affected. The new host is a shiny PowerEdge T320, courtesy of my loving and very awesome wife. In addition, this series presumes all work is done on a flat network with no VLANs for simplicity’s sake.
There are plenty of Auto Deploy tutorials on the internet. While this walkthrough provides a comprehensive guide to the entire process, I focused on a few specific areas. Everything is done through the vSphere Web Client – the way of the future! For DCHP, I use ISC’s product on CentOS. The services are spread among a large number of VMs so we can work with each component discreetly, though you can combine much of the functionality into 1 or 2 VMs. At the end, I will cover some common issues and how to troubleshoot them. Last, I briefly explore a CentOS tftp server for those who wish to be Windows free.
Today, we will focus on the Auto Deploy and TFTP services on a Windows VM and updating our DHCP settings.
Building a Windows Server 2008R2 VM
Hopefully, you already have a golden image for Windows. If not, spend some time to develop a template. Deploy a template and join it to the domain before continuing. My VM is called autodeploy.
We need to install the Auto Deploy service, but have some prerequisites to meet first. I do not like using the VM console if I can avoid it, so make sure RDP is enabled with Network Level Authentication (NLA) via Server Manager. Click on the Configure Remote Desktop icon on the right hand side and allow connections from computers with Network Level Authentication (NLA). Select without NLA if you need to, but hopefully that is not the case (WinXP support ends in April!). If necessary, click Select Users to add your non-administrator accounts. In my lab, my user account is an administrator, so I skip that step and hit OK.

Now you can connect with RDP for the remaining steps.
The next prerequisite is .NET 3.5, because SolarWinds’s TFTP server requires it. If this is part of your image, perfect. If not, you need to install it yourself. The Solarwinds installer will point you to an invalid download from Microsoft. Instead, I went back to Server Manager, Features, and chose .NET 3.5.1. 
Click Install, then Next until it is complete. Download and install the Solarwinds TFTP server. It is another Next/Next/Finish set of dialogs, plus a UAC prompt.
Now, the TFTP server is installed and in the start menu. Launch it, say yes to the UAC prompt, and the TFTP Server is running. You can configure settings and/or start the service under File -> Configure. The default TFTP root directory is C:\TFTP-Root, which should be fine for most people.
One last setting is required: a firewall rule to allow inbound connections. If you are running Server 2012 or above, there’s PowerShell cmdlets for this:
New-NetFirewallRule -DisplayName "Allow Inbound TFTP Server Access" -Direction Inbound -LocalPort 69 -Protocol UDP -Action Allow
Otherwise, open the Windows Firewall management console and add a new Port rule manually, specifying Inbound, UDP, port 69, and the description Allow Inbound TFTP Server Access. The default action is what we want, allow.
Installing Auto Deploy
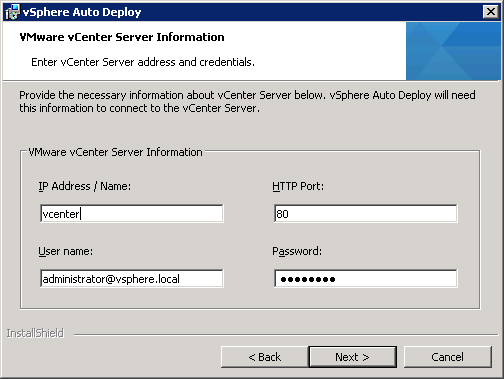
Auto Deploy is on the vCenter ISO. Mount the ISO through vCenter and chose vSphere Auto Deploy from the autorun screen. The install is fairly simply, a Next/Next/Finish install – for the most part. You will be prompted for the vCenter server name, port, and authentication. I recommend using the administrator@vsphere.local account (lab) or a dedicated service account (production) rather than a user account. After providing the authentication information, Next your way through the install.
DHCP Settings and Files
For the next few steps, we need to get some information from the vCenter Auto Deploy settings. Launch the vSphere Web Client. Click on the vCenter icon, the vCenter object, Manage, Settings, Auto Deploy. Follow the download link (https://servername:6502/vmw/rbd/deploy-tftp.zip), transfer the file to the tftp server, and expand the file in the TFTP server’s configured root directory. Do not save the ZIP file itself, you only need the contents.
Note: The download link is NOT password protected. You can grab the URL from within the vSphere client on your machine and use wget/curl from the TFTP server – probably more helpful if you’re using a *nix TFTP server.

We need the other two pieces of highlighted information for the DHCP settings. On a Windows DHCP server, you can simply scroll down to options 66 and 67 and put the settings in. In the ISC DHCP server config, you have to provide a name for each option. The bootfile-name is the BIOS DHCP File Name; the next-server is just the IP address or DNS name in the iPXE Boot URL field. Here are the values to add to your DHCP config:
    #Auto Deploy for vSphere
    #option 66
    next-server "10.0.0.242";
    #option 67
    option bootfile-name "undionly.kpxe.vmw-hardwired";
Make sure the settings are applied at the correct network scope and restart the service so the changes take effect (service dhcpd restart).
Aside: I googled for “isc dhcpd.conf option 66” and found some documentation suggesting to use “option tftp-server-name <text>;” for Auto Deploy. However, it did not work for me. You could set both options in case different PXE client looks for different options.
In Part Two of the Auto Deploy Deep Dive Series, we will build a host profile in preparation for the deployment.
