vDM30in30 2015 Retrospective

Today ends my vDM30in30 challenge. This makes the 30th post and goes out just a bit before the end of the day on November 30th, 2015. I hit the mark within the timeframe, yay! That’s an improvement over last year’s 25 posts. Writing 30 posts in 30 days was difficult for me, but rewarding. Let’s take a look at why I participated, what I did, and whether it helped me.

I participated in vDM30in30 this year, as in last year, to work on my writing skills. Specifically, I wanted to work on speed. I can write a really long blog post, no problem – some of my Puppet posts were over 5,000 words before I split them up – but it takes me FOREVER! I wanted to work on writing posts of the same length in a shorter duration, but without lowering the quality. This was more than just a requirement to get 30 posts done in 30 days, but something that I think can benefit me elsewhere. Sometimes I spend 10 minutes writing a non-technical email that’s just a single paragraph, and I don’t think that’s really worthy of one sixth of an hour. I was sure I would gain in other ways, but everything was secondary to speed.

Well, not everything. Right before the challenge started, I joined the other participants in trying to encourage others to participate in the challenge. We succeeded, as we had a number of new participants in this year’s challenge! I’ve also spoken to a few people who missed out on the challenge but don’t want to wait until next November to participate, so they may be looking at running the same challenge in January! If anyone else is interested in joining them, let me know in the comments. Thanks to everyone who participated in the challenge, new and existing participants, it was great to see this grow year over year!

Now, back to my challenge efforts. To work on speed, I used a number of tactics:

  • Varied topics. Much of my blog content is what I would consider deep technical content. I wasn’t certain that increasing speed here with the given timeframe was feasible, but I was certain that I could improve speed on this content if I improved speed on other content. I wrote about vSphere, Puppet, Travis CI, and Ruby bundler (all in a not-quite-as-deep manner), and I also branched out into an ode to snow, thoughts on Footloose and 2112, troubleshooting, note taking techniques, our pug Loki, and even got meta about post quality and what to do when the well runs dry.
  • Make November a month of projects. I participated in the challenge while continuing work on other projects (upgrading modules for puppet 4 support, learning Travis CI, Commitmas), making each of these projects fodder for vDM30in30. This ties into the next item, as the project milestone often came under the same time limit.
  • Set a (soft) timer. I often did this by deciding that I had X minutes available, I had a topic I thought could be done in X minutes, and I’d write and post it immediately. I gave myself enough time to do proofreading but I tried to keep to whatever time limit I set. Sometimes I’d have to stop writing because I had to leave the house, and hitting the Post button was difficult but necessary. Of course, I still wanted to keep the quality up so I reserved the right to not hit post or ditch the post entirely. I only made use of this once, and I just needed 5 minutes for proofing when I got back to the computer.
  • Use brainstorming sessions. My normal technique is to think of something I want to write about and then do it. Instead, I would spend 10-30 minutes thinking of what I wanted to write about and making a list in Evernote. By making the list ahead of time, I had a number of solidd ideas to toss around in my head for a few days. When I sat down to write, I often had a rough outline or a list of points to emphasis already. This became especially important at the end of the journey when I started to run out of ideas. If I was going to rack my brain, I wanted to do it for 5 subjects, not just one!
  • Press the post button! Of course, none of the above techniques mattered if I didn’t post the article. I didn’t schedule a single post, every article was made live the moment it was finished. Getting over the fear of hitting post quickly became a secondary goal.

So, did this help me, did I achieve what I set out to? I hit the mark of 30 posts in 30 days and I certainly feel like I improved. I know that I’m proud of myself for following up on my pledge! But did I improve my speed while maintaining or improving the quality of my content? I need to hear from you! I appreciate any and all feedback here in the comments or on twitter. Thank you!

You can see all of the vDM30in30 posts here, including those from 2014.

Minecraft module for Puppet

At PuppetConf, I had the pleasure of meeting Bren Briggs, who I knew from twitter and IRC, so I was pretty happy when he asked me if I wanted to work on a Minecraft module with him. Of course we’re busy with life and work and the holidays, so we haven’t started yet, but we’re going to try soon!

Bren floated some ideas past me and one of the big questions was, do we want to deploy the Minecraft instance as if we’re on bare metal or via Docker? He started a twitter poll, but those things only last 24 hours and we only received 3 votes. If you were going to use a Minecraft module, would you want one that uses Docker or one that does not?

I’m a little biased here, but I hope people want to see Docker. I’ve not used Docker in anger before, and I need more motivation to update my kickstart setup from EL6 to EL7. But don’t let me sway you, let us know what YOU would like to see. Thanks!

#Puppetinabox moving to v4 in 2016

I recently used Travis CI to help me get all my puppet modules and my controlrepo ready for Puppet v4. I have one dependent module (ajjahn/dchp) that needs a few polishing touches (issue #7) and then I plan to start moving PuppetInABox to version 4 as well. There are many moving parts but I would like to get this done in the first quarter of 2016.

One thing I will need to do is convert the master’s service from apache/passenger to puppetserver. Unfortunately, stephenrjohnson/puppet does NOT support puppetserver or puppet v4 yet. There are a number of forge modules that provide some level of support for puppetserver and I could use your help in finding the right one. It would seem the clear winner, at least by downloads, is camptocamp/puppetserver. Maybe one of the others is better. Perhaps the stephenrjohnson/puppet module is nearing readiness for version 4.

What are you using, and what tips do you have for someone converting from version 3 to 4? Drop me a line in the comments or reach out on twitter. Thanks!

Success with a first year flag football team

I have been playing flag football for almost 10 years now and I enjoy it immensely. Last year, when we moved to Indianapolis, I was dismayed that I could not find a competitive league to play in. There are a number of weekly pick-up games, though, and through them I learned of a men’s church league and was invited to join a new team there.

New teams can be tricky. A “new” team that’s a split of an existing team with a few new players can often go far, they have a core that’s intact and capable. I ended up on a real new team, where only two members had played together previously and some had never played flag football before. Flag is quite different than regular football. There’s no downfield blocking, you can’t stiff arm, you can’t tackle. All of those lead to penalties or ejections and are often what trip up people new to flag rules, even if they’ve played some HS, College, or even NFL ball. You also lack any connection between players. The quarterback might under- or overestimate a receiver’s speed and end up throwing lots of picks.

For this reason, it’s no surprise that many new teams go 0-X, rarely going 1-X, and almost always losing badly in playoffs if they make it there. In the regular season, we went 1-6. We ended up losing our last regular season game to the #1 team 66-24. Ouch. That put us in last place, meaning we got to play them again the next week in the first round of the playoffs. It would be easy to foresee the loss and throw in the towel right away. I’ve seen lots of teams play a man down due to low attendance or even forfeit that game, knowing it would be a blow-out. Can’t blame anyone, you don’t get paid and some people drive an hour each way plus the game time.

Instead, our team stayed with it. We had more people show up than the previous week. We analyzed what went wrong and came up with a game plan. The opponents used a quick strike offense with timing routes, so we rushed often and played press. By halftime, their QB had thrown 3 picks and we managed to keep it tied. We ended up winning 28-27, scoring the go-ahead points with 12 seconds left. We surprised everyone just by showing up and wowed them by beating the #1 seed.

The next week, we had a matchup against the #2 team. We had the same number of people show up and we again put a game plan together. We had not played the team the week before so our game plan wasn’t quite as good. We went on to lose by one score, 47-42, bringing the team down to the wire.

It was a hell of a season. It was fun to fight adversity and come together as a team to victories, both real and moral. I can’t wait for the spring season to see where we go from here!

What an old dog can teach us

Today is Thanksgiving in America. I’m conflicted in how I feel about Thanksgiving, thanks to John Oliver and Last Week Tonight, but I am undoubtedly thankful for a lot of things – my family, my friends, having a job, community, etc. One thing my wife, Michelle, and I are really thankful for is that our nearly 15 year old pug, Loki, is still with us this Thanksgiving.

Loki Resting

Catching some Z’s

Loki Spider

Dressed as a spider

His favorite treat, a giant carrot!

Enjoying his favorite treat, a giant carrot!

As Loki has aged, he’s remained a vibrant character, always living up to his namesake, but time catches up with us all. These changes have taught my wife and I a lot over the years, lessons that we can apply elsewhere in our lives.

About 5 or 6 years ago, Loki lost his hearing. It took us quite a while to catch on! We had taught obedience using verbal and hand signals. A “down” command was accompanied by moving your hand, palm down, toward the floor. As long as Loki was looking at us, he was quite obedient. One day, we went for a walk and on the way back, Loki lost visual contact with Michelle and thought she was behind us. He took off down the street, ignoring our shouts, which was quite alarming. He got in a lot of trouble for that, and we still did not understand the issue for a few days until we said “treat” and he didn’t react – that’s how you know for certain that a dog is deaf! Loki taught us that when someone cannot verbalize their problems, it’s up to you to “listen” to the other signals they send. It’s your fault that you didn’t use the right vocabulary to understand them, and you shouldn’t get mad at them.

A few years later, Loki started having issues with his eyesight. As we had become quite reliant on hand signals since he was deaf, this was problematic! His vision has faded slowly, thanks to some good veterinarian ophthalmologists, but it’s going bit by bit. This has caused some other health issues as he is now prone to scratch his eyes, and we’ve been to the vet more than once for a scratched cornea. The poor guy has to wear a cone when he’s not closely supervised!

Altogether, these vision problems have taught Michelle and I quite a bit. We have to rely on Loki’s sense of touch more often. He may look right at you but not see you, so you have to rely on other senses, such as touching him with your hand or foot to get his attention. If he doesn’t see us, he may run to another room to look for us – and he’s fast! We spend a lot of time chasing him around the house now, trying to get his attention. This has taught us, again, to be patient with him and not get mad. We also have to pay more attention for him and anticipate where he’s heading, as he could run into something that hurts very easily.

Finally, over the summer we discovered an inoperable tumor in Loki’s mouth. Though it’s growing and we can’t do anything about it, you could hardly tell, he’s as feisty as ever. But we realize this could be his last Thanksgiving with us. We’re thankful that he’s still here and we’re hopeful he makes it to his 15th birthday in two weeks and Christmas after that. We’ve learned to spend more time with him than we were before and to enjoy every moment of it!

Loki, thanks for spending so much time with us and for teaching us so much! You’re the best pug anyone could ask for!

vCenter 6 permissions model changes

If you have not yet upgraded from vCenter 5.5 to 6, you may want to give it a shot. vCenter 6 is much faster and introduces a lot of nice UI improvements. One of my favorites is the relatively minor change that when you delete a VM, it displays the VM name in the dialog instead of “this object”. In any case, it’s pretty swanky and I think you’ll like it.

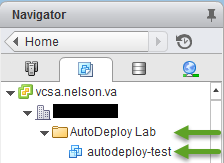
However, there is one extremely noticeable, but (in my opinion) poorly documented change, in the permissions model for non-Administrator users and groups. In 5.x, you could assign user rights to a folder or VM and the user would be granted the proper level of access to the folder members or the individual VM. If this was your folder layout…

vCenter 6 Permissions 1

…and you wanted to grant Virtual Machine Power User access to the VM autodeploy-test, you could grant that permission to a user or group on the folder or VM here and the user could manipulate their VM just fine:

vCenter 6 Permissions 2

After upgrading to 6.0, the same user would not have permission to access the folder or VM. They might simply see Empty Inventory when looking at the VM and Templates view. To remedy this, you need to grant non-propagating permissions at the intermediate Datacenter tier (you do NOT need to grant permissions to the vCenter object). These permissions can be as limited as read-only in most cases, but as they are not propagating, you can use the same permission level (e.g. Virtual Machine Power User). The new permission is highlighted in red:

vCenter 6 Permissions 3

If you have multiple intermediate folders, you’ll need to assign the non-propagating permissions at every level. You’ll need to do the same on the Hosts and Clusters, Datastores, and Network views as well. In an additional wrinkle, Network view permissions for Distributed vSwitches cannot be assigned on the DVS, they need to be assigned on a folder containing the DVS and optionally on an individual Distributed PortGroup.

I have heard rumors that this new “feature” may be fixed soon, but until then, these changes are required for non-Administrator users to maintain their permission levels.

Speeding up Travis CI with Containers

Another quick Travis CI post. Travis CI now supports containers, which means potentially faster builds. There are two lines you can add to your .travis.yml:

sudo: false
cache: bundler

The first enables the container infrastructure. The second caches dependencies for a Ruby project. Travis CI has articles on the new architecture and caching content and dependencies that provide more detail if you need it. I didn’t see as much of a speedup with caching, but enabling containers definitely made it faster.

Allowing expected failures with Travis CI

Recently, I started setting up my puppet modules with Travis CI. One thing that bothered me was that once I added a new version to the matrix, it had to pass with that version or the PR would have a red mark. Today, I found out how to ignore those new versions with the allow_failures key in the matrix hash of .travis.yml. For instance, if I am currently testing up to Puppet 3.7.0 and I to start testing with 3.7.0 future parser and 4.0.0, I add the new versions to the env hash and the matrix‘s allow_failures key. The new lines are in bold:

---
sudo: false
language: ruby
branches:
  only:
    production
bundler_args: --without development system_tests
script: "cd dist/profile && bundle exec rake test"
notifications:
  email: false
rvm:
  - 1.9.3
  - 2.0.0
  - 2.1.0
env:
  - PUPPET_GEM_VERSION="~> 3.3.0"
  - PUPPET_GEM_VERSION="~> 3.4.0"
  - PUPPET_GEM_VERSION="~> 3.5.0" STRICT_VARIABLES=yes
  - PUPPET_GEM_VERSION="~> 3.6.0" STRICT_VARIABLES=yes
  - PUPPET_GEM_VERSION="~> 3.7.0" STRICT_VARIABLES=yes
  - PUPPET_GEM_VERSION="~> 3.7.0" STRICT_VARIABLES=yes FUTURE_PARSER=yes
  - PUPPET_GEM_VERSION="~> 4.0.0" STRICT_VARIABLES=yes
matrix:
  exclude:
  # Ruby 2.1.0
  - rvm: 2.1.0
    env: PUPPET_GEM_VERSION="~> 3.2.0"
  - rvm: 2.1.0
    env: PUPPET_GEM_VERSION="~> 3.3.0"
  - rvm: 2.1.0
    env: PUPPET_GEM_VERSION="~> 3.4.0"
  allow_failures:
    - env: PUPPET_GEM_VERSION="~> 4.0.0" STRICT_VARIABLES=yes
    - env: PUPPET_GEM_VERSION="~> 3.7.0" STRICT_VARIABLES=yes FUTURE_PARSER=yes

Now, when Travis CI runs, it will add the new versions to the match and will mark the designated versions separately as Allowed Failures. You can see this in action with puppetinabox/controlrepo build #22, which contains expected failures and so is considered a passing build. I can now develop against my supported versions and test against new versions, without affecting my test results. This has solved a pretty big frustration for me. Hopefully, it helps you as well!

The Joy of Snow and Seasons

I love the changes the seasons bring. The warmth and rebirth of spring, the long days and sunshine of summer, the cooling temperatures and changing leaves of fall, and the snow and shorter daylight of winter. In particular, I really, really love the snow. I love watching it snow, I love the dogs playing in it, and it’s great football weather. Sure, I don’t love raking leaves and shoveling snow, but the benefits far outweigh these negatives.

This may seem an odd thing to wax poetic about, but my wife and I grew up in the MidWest and North, respectively, and spent almost a decade in the South. We really missed the seasons when we were in North Carolina, where the summer is about 9-10 months long. Living in Eastern VA was a bit better, the seasons were closer to 3 months each and we got snow a few times, but it was rare enough that you’d have to be crazy to drive in it. We’re now in Indiana, where the seasons are seasonal and snow is just something that happens.

This past weekend was the first snow of the season, which was really fun. I even got to play some flag football in it which is amazingly fun. I love me some snow!

Modern rspec-puppet practices

I’ve written a bit about rspec-puppet in the past (directly here, here, and here, and indirectly here and here). The state of rspec-puppet has changed over the past year and change, though. Let’s see if we can collect the current practices in one place.

First, there’s a better way to deploy rspec-puppet than I wrote about earlier. If you’re implementing rspec-puppet brand new today, I suggest starting with puppet-module-skeleton as your base. If you’re upgrading an existing setup, take a closer look at the skeleton’s Gemfile, Rakefile, .rspec, .rubocop, spec/spec_helper.rb, /spec/spec_helper_acceptance.rb.erb, spec/classes/coverage_spec.rb, and spec/classes/example_spec.rb.erb and bring in the updates that are relevant. If you want to use hiera for your testing, I suggest adding these lines to spec/spec_helper.rb (PR submitted).

By using the Gemfile from puppet-module-skeleton, you can now use bundler to manage your gems instead of installing them globally on your nodes. Run bundle install first. You can then run the full suite of tests with bundle exec rake test, or simply run rspec with bundle exec rake spec_prep and rake spec_standalone. If you get into trouble, you can use git clean -fdx to remove all the untracked files, mostly from rspec fixtures.

Next is writing the tests. Writing rspec tests can be done with a few different matchers, but it { is_expected.[not_]to contain_<resource>(‘<resourcename>’) } is a common format. Of course, the officially documented matchers work just fine, though you may not see them in the wild very much. As for the tests themselves, always be sure that you are testing your code, and only your code. If you’re including a component module in your profile module, test that the component module is installed, but don’t test the component module’s resources – the module should have its own rspec tests. If it does not, add those tests to the component, not your profile. And of course, do not test Puppet itself – it also has rspec tests!

I do suggest using hiera instead of the :params symbol, though. This can help you design your hiera data while you work on rspec tests, to make sure you know what the hiera data should look like, not just what you think it should look like. Second, I think it is easier to set an additional top-level fact once, in the top describe block, than to set numerous params in each context block, though I believe you have to for defined types.

For general rspec guidance, check out Better Specs. It’s very helpful whether you’re writing tests for puppet or something else. I’ve also created a repository to track great examples of puppet module tests, broken down by area, called puppet-reference_modules. If you see a great example, please submit a PR!

These are the common practices as I understand and observe them. Is there anything I’ve missed or gotten wrong? Let me know!