Update: I have since published a forge module rnelson0-local_user that can be used to distribute keys as well. If you are using keys with local users, I highly recommend using the forge module. If you are not managing the users directly (say, for domain-joined nodes), continue to use the solution presented belwo.
Today, let’s look at deploying SSH Authorized Keys via puppet. An authorized key is a public key used for public key authentication (not to be confused with an ssh key, which is the unique key identifier of a host that verifies the server is who it says it is). By attaching an authorized key to a user, any login attempt for that user that presents the corresponding private key will be authenticated successfully, giving you the ability to log in without a password. This is commonly used for automation, where no user is present to enter a password, or for a user with a private key to access systems without additional steps.
Authorized keys are typically considered more secure than a password, but they rely on protecting the private key. If the private key is not secured, anyone who obtains the private key can impersonate the account. If a non-privileged user’s key is lost, only that user’s access and files are at immediate risk. An attacker would still need to escalate privileges to damage the system. If a privileged user’s key (no-one reading this logs in as a privileged user, such as root, right? RIGHT?) or an automation account’s key is lost, the immediate risk is much higher. An attacker might gain access to the entire system or be able to attack other systems. You must absolutely secure private keys and ensure you follow the principle of least privilege for all users, especially automation accounts.
Let’s look at an example of how to use a properly secured authorized key. In past articles, we’ve built a yum repository and a build server. You may be logging into these servers frequently and transfering files between the two. Every time, you need to enter your passwords. That gets old, quickly. If you had an authorized key in place, you can ssh to both servers and present your private key, no password. If you copy the private key to the build server or create a new key, you could scp files from the build server to the yumrepo the same way. This should make life a lot easier for you.
There are lots of ways to generate keys depending on your OS and applications. My workflow is to use Putty on a Windows 7 laptop to connect to linux VMs, then use the linux openssh client to ssh to other linux VMs. I’ll cover generating and configuring keys with Putty and openssh.
Putty keys
Windows users can download putty and puttygen here. Run puttygen first. The key generator is very simple. Select the type of key (SSH2-RSA) and number of bits (default is 1024, I suggest 2048 or higher) and click the Generate button.

You’ll be asked to move the mouse around a specified area to generate randomness (entropy). When you’ve generated enough, you’ll have a key.

Helpfully, you’ll be able to hit ctrl-c and grab the authorized key you need. Here’s what mine looks like:
ssh-rsa AAAAB3NzaC1yc2EAAAABJQAAAQBxjRfeEHj2n9bKt1VBBiJUri396kprjndOgd5CVc6MvdbEsL96d
RUcd2J/d4Tu0vYqpsRaUh9lfPfW8CThBrMFZfvGkGPF5vKrlffELyfrJxPPnRJIazmee1g6U1AwNhiJNiwp0d
LHcnUvozfXagWI1fDg6uT6/M3CrUwqLBQsOLxYx5qFpAQjDvrbGkBXF/XcW97wglzr/INUcKaAKWSitj+5TPw
gjGzVty5k+uGxHxNZUGEF3qVNKb11sifKxvNYgaT+86x2Ir2qH/6CJrTqWdF/Bw+1hNPOjS/En+9A7jG9txPX
Q35X9sDgE+xxmkxMFtZZFxV6y/Uk+zcAzwE1 rsa-key-20141029
You need to click on the Save private key button and secure this key. You’ll definitely want to make sure it’s available to you in the future as well, so back it up. A secure cloud storage service, in a folder that is NOT shared, might be a good location. You probably want to Save public key as well, though if you save the string above, it’s not strictly required.
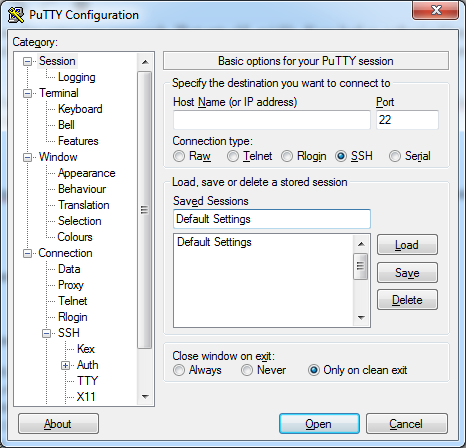
To use this key, launch putty. Under Connection -> SSH -> Auth, point the Private key file for authentication: to your private key. Next, go up to Session, enter Default Settings in the Saved Sessions name and click Save. This key will now be used by default when connecting to any IP address.

Openssh keys
On my linux VM, the openssh ssh client and ssh-keygen applications are already installed. These are typically present on most modern *nix systems, so these steps may work for your OS with little to no modification.
Run ssh-keygen -b 2048. The default type is SSH2-RSA, as we used with putty-gen, but the byte default is 1024 so we want to override that. You may optionally enter a passphrase. This is like a password for your certificate and you may not want that. You certainly do not want a passphrase for automation keys, since either no-one will be present to enter the key or the automation script will enter it automatically, defeating the purpose of a passphrase. After you provide or skip the passphrase, you’ll be provided with the location of the private and public keys and a fancy-looking randomart interpretation of the key. If it’s not pleasing to your eye, then it’s useless and you can forget about it, otherwise print it out and put it over your desk. Lastly, cat the pub file and you’ll see a string similar to what puttygen provided.
[rnelson0@build ~]$ ls .ssh
id_rsa  id_rsa.pub  known_hosts
[rnelson0@build ~]$ rm .ssh/id_rsa*
[rnelson0@build ~]$ ls .ssh/
known_hosts
[rnelson0@build ~]$ ssh-keygen -b 2048
Generating public/private rsa key pair.
Enter file in which to save the key (/home/rnelson0/.ssh/id_rsa):
Enter passphrase (empty for no passphrase):
Enter same passphrase again:
Your identification has been saved in /home/rnelson0/.ssh/id_rsa.
Your public key has been saved in /home/rnelson0/.ssh/id_rsa.pub.
The key fingerprint is:
6e:14:17:38:aa:1e:9d:dd:e0:21:be:64:9d:07:e3:e9 rnelson0@build
The key's randomart image is:
+--[ RSA 2048]----+
|         ..      |
|        o  .     |
|       ....      |
|      o =o       |
|     + BSO       |
|    o *oB o      |
|   . + oo.       |
|    . ..E        |
|                 |
+-----------------+
[rnelson0@build ~]$ ls .ssh/
id_rsa  id_rsa.pub  known_hosts
[rnelson0@build ~]$ cat /home/rnelson0/.ssh/id_rsa.pub
ssh-rsa AAAAB3NzaC1yc2EAAAABIwAAAQEAnoeEgdExZhsiWm0tln++sFuQZGX/U8wTQU
v/uo2WMdfTD4cnI8XvXzEAwcVQQ/Y2u5kkWUbYJvSHfoDwDlL8xoevjOecWfegYVe4UEaY
e4LhAE8GijtnTBsroB+AJl4WYvXdACzfxB7xTNjYQKfxvoJd3QdQi9IJQdb4HmjC2doVPK
rR+DeVdNt5L/ziXvtGp9A0w3CKyl2wZ5A6MLIlkCN0Kad8/mcfhi7eQ6XZUfC84ksx7+t+
/2BR1pwf67Z93VxPtPMWiyUjkYHjw3CVAue5L2fOwFhpaFOSAqzBEMsMHrXSS+8U2/lhi4
XBl4zAH2PNUv1KnHfc5sBk95CgGw== rnelson0@build
On rare occasions, your *nix of preference may store the key in a different format that looks like this:
---- BEGIN SSH2 PUBLIC KEY ----
Comment: "2048-bit RSA, converted from OpenSSH by rn7284@build"
AAAAB3NzaC1yc2EAAAABIwAAAQEAnoeEgdExZhsiWm0tln++sFuQZGX/U8wTQUv/uo2WMd
fTD4cnI8XvXzEAwcVQQ/Y2u5kkWUbYJvSHfoDwDlL8xoevjOecWfegYVe4UEaYe4LhAE8G
ijtnTBsroB+AJl4WYvXdACzfxB7xTNjYQKfxvoJd3QdQi9IJQdb4HmjC2doVPKrR+DeVdN
t5L/ziXvtGp9A0w3CKyl2wZ5A6MLIlkCN0Kad8/mcfhi7eQ6XZUfC84ksx7+t+/2BR1pwf
67Z93VxPtPMWiyUjkYHjw3CVAue5L2fOwFhpaFOSAqzBEMsMHrXSS+8U2/lhi4XBl4zAH2
PNUv1KnHfc5sBk95CgGw==
---- END SSH2 PUBLIC KEY ----
This is the RFC 4716 SSH Public Key Format. It’s ugly, but platforms that do not use openssh, like Solaris, may need this format. You can alternate between the two formats by using the -e (RFC) and -i (OpenSSH) arguments to ssh-keygen, like so:
[rnelson0@build ~]$ ssh-keygen -e -f /home/rnelson0/.ssh/id_rsa.pub > test.pub
[rnelson0@build ~]$ cat test.pub
---- BEGIN SSH2 PUBLIC KEY ----
Comment: "2048-bit RSA, converted from OpenSSH by rnelson0@build"
AAAAB3NzaC1yc2EAAAABIwAAAQEAnoeEgdExZhsiWm0tln++sFuQZGX/U8wTQUv/uo2WMd
fTD4cnI8XvXzEAwcVQQ/Y2u5kkWUbYJvSHfoDwDlL8xoevjOecWfegYVe4UEaYe4LhAE8G
ijtnTBsroB+AJl4WYvXdACzfxB7xTNjYQKfxvoJd3QdQi9IJQdb4HmjC2doVPKrR+DeVdN
t5L/ziXvtGp9A0w3CKyl2wZ5A6MLIlkCN0Kad8/mcfhi7eQ6XZUfC84ksx7+t+/2BR1pwf
67Z93VxPtPMWiyUjkYHjw3CVAue5L2fOwFhpaFOSAqzBEMsMHrXSS+8U2/lhi4XBl4zAH2
PNUv1KnHfc5sBk95CgGw==
---- END SSH2 PUBLIC KEY ----
[rnelson0@build ~]$ ssh-keygen -i -f test.pub
ssh-rsa AAAAB3NzaC1yc2EAAAABIwAAAQEAnoeEgdExZhsiWm0tln++sFuQZGX/U8wTQU
v/uo2WMdfTD4cnI8XvXzEAwcVQQ/Y2u5kkWUbYJvSHfoDwDlL8xoevjOecWfegYVe4UEaY
e4LhAE8GijtnTBsroB+AJl4WYvXdACzfxB7xTNjYQKfxvoJd3QdQi9IJQdb4HmjC2doVPK
rR+DeVdNt5L/ziXvtGp9A0w3CKyl2wZ5A6MLIlkCN0Kad8/mcfhi7eQ6XZUfC84ksx7+t+
/2BR1pwf67Z93VxPtPMWiyUjkYHjw3CVAue5L2fOwFhpaFOSAqzBEMsMHrXSS+8U2/lhi4
XBl4zAH2PNUv1KnHfc5sBk95CgGw==
By default, the openssh ssh client will use the key stored in ~/.ssh/id_rsa to identify itself to remote systems. You can generate an additional key with ssh-keygen -f and use it with ssh -i ~/.ssh/ … as required. You likely won’t need this for an individual user, but it can be helpful with automation where you want separate keys for each remote system to reduce risk to those remote systems if a particular private key is made public. We’ll assume going forward that only the default key has been created and is being used.
The ssh_authorized_key resource type
Puppet has a built-in resource type of ssh_authorized_key. By defining a resource that matches our authorized key and applying it to a system, we can authenticate using that key. We’ll focus on our build server, where which we connect to from the Windows laptop. Here’s what a login attempt looks like now, with Putty configured to present our key but without an authorized_key configured on the VM:
login as: rnelson0
CentOS release 6.4 (Final)
Kernel \r on an \m
Server refused our key
rnelson0@build.nelson.va's password:
Last login: Tue Oct 28 15:27:04 2014 from 10.0.0.200
[rnelson0@build ~]$
The server refuses the key and requires a password. Presenting the key doesn’t harm anything, but it’s not helping either… yet. Let’s define a key in the file ssh_authorized_key.pp and apply it. Note that there are no line breaks in the manifest, I simply added some for readability on this blog.
ssh_authorized_key { 'rnelson0@putty':
  user => 'rnelson0',
  type => 'ssh-rsa',
  key  => 'AAAAB3NzaC1yc2EAAAABIwAAAQEAnoeEgdExZhsiWm0tln++sFuQZGX/U8wTQU
   v/uo2WMdfTD4cnI8XvXzEAwcVQQ/Y2u5kkWUbYJvSHfoDwDlL8xoevjOecWfegYVe4UEaY
   e4LhAE8GijtnTBsroB+AJl4WYvXdACzfxB7xTNjYQKfxvoJd3QdQi9IJQdb4HmjC2doVPK
   rR+DeVdNt5L/ziXvtGp9A0w3CKyl2wZ5A6MLIlkCN0Kad8/mcfhi7eQ6XZUfC84ksx7+t+
   /2BR1pwf67Z93VxPtPMWiyUjkYHjw3CVAue5L2fOwFhpaFOSAqzBEMsMHrXSS+8U2/lhi4
   XBl4zAH2PNUv1KnHfc5sBk95CgGw==',
}
[rnelson0@build ~]$ sudo puppet apply ssh_authorized_key.pp
[sudo] password for rnelson0:
Notice: Compiled catalog for build.nelson.va in environment production in 0.05 seconds
Notice: /Stage[main]/Main/Ssh_authorized_key[rnelson0@putty]/ensure: created
Notice: Finished catalog run in 0.06 seconds
Let’s launch a new putty session against this VM and provide our username again:
login as: rnelson0
CentOS release 6.4 (Final)
Kernel \r on an \m
Authenticating with public key "rsa-key-20141029"
Last login: Wed Oct 29 14:12:44 2014 from 10.0.0.200
[rnelson0@build ~]$
Success! You can now authenticate using the key rather than a password. However, if you ssh to any other node, you’ll still need to use a password. The key needs to be present on all nodes in your network. We could take the ssh_authorized_key resource in the manifest file and insert it into profile::base. That would add it everywhere, or at least try to. Puppet can manage network and windows devices, and what happens if you apply the same resource there? Would you want to apply the resource there? We could avoid such potential problems by defining profile::authorized_keys::administrators. By applying this profile to the correct roles, we have a bit more control over which nodes have which authorized keys, but we’re still having to define and apply profiles properly. There’s another way.
Hiera to the rescue
As we discovered before, hiera allows us to remove our data from our code. Authorized keys sound a lot more like data than code to me. We can place keys in hiera and apply them as necessary according to our hierarchy (note: review hiera lookup methods to ensure you understand how the hierarchy is used to determine values). Let’s look at our ssh_authorized_key defined in YAML (again there are no line breaks in an actual file, this is just for readability):
ssh_authorized_keys:
  'rnelson0@putty':
    user: 'rnelson0'
    type: 'ssh-rsa'
    key:  'AAAAB3NzaC1yc2EAAAABIwAAAQEAnoeEgdExZhsiWm0tln++sFuQZGX/U8wT
     QUv/uo2WMdfTD4cnI8XvXzEAwcVQQ/Y2u5kkWUbYJvSHfoDwDlL8xoevjOecWfegYV
     e4UEaYe4LhAE8GijtnTBsroB+AJl4WYvXdACzfxB7xTNjYQKfxvoJd3QdQi9IJQdb4
     HmjC2doVPKrR+DeVdNt5L/ziXvtGp9A0w3CKyl2wZ5A6MLIlkCN0Kad8/mcfhi7eQ6
     XZUfC84ksx7+t+/2BR1pwf67Z93VxPtPMWiyUjkYHjw3CVAue5L2fOwFhpaFOSAqzB
     EMsMHrXSS+8U2/lhi4XBl4zAH2PNUv1KnHfc5sBk95CgGw=='
We’ll add this to global.yaml. You could do this at any level of the hierarchy and probably should, but my lab’s hierarchy isn’t that complex. The next step is to modify the site manifest to discover this hash and create ssh_authorized_key resources. Be sure to create a new git branch and to redeploy environments after making the change. Here’s what the new default class definition looks like, the change is in bold:
[rnelson0@puppet puppet-tutorial]$ git checkout -b authorized_key_demo
Switched to a new branch 'authorized_key_demo'
[rnelson0@puppet puppet-tutorial]$ vi manifests/site.pp
[rnelson0@puppet puppet-tutorial]$ cat manifests/site.pp
Package {
  allow_virtual => true,
}

node default {
  hiera_include('classes')
  $ssh_authorized_keys = hiera_hash('ssh_authorized_keys', undef)
  if ($ssh_authorized_keys != undef) {
    create_resources('ssh_authorized_key', $ssh_authorized_keys)
  }
}
Commit your change, push the new branch upstream, and re-deploy your environments. Run against the authorized_key_demo environment and you shouldn’t see any changes on the build server. Delete the .ssh/authorized_keys file and puppet will recreate the file.
[rnelson0@build ~]$ sudo puppet agent -t --environment=authorized_key_demo
...
Info: Applying configuration version '1414605740'
Notice: Finished catalog run in 1.05 seconds
[rnelson0@build ~]$ rm .ssh/authorized_keys
[rnelson0@build ~]$ sudo puppet agent -t --environment=authorized_key_demo
...
Info: Applying configuration version '1414605740'
Notice: /Stage[main]/Main/Node[default]/Ssh_authorized_key[rnelson0@putty]/ensure: created
Notice: Finished catalog run in 0.99 seconds
Voila! If you merge this into production, then all nodes should shortly have this key. Before we do that, let’s look at a second problem.
Inter-node communication
We solved the issue where a non-puppet-managed node wants to authenticate to a puppet-managed node. I can ssh from my laptop to all the nodes, yay. If I’m on the build server and need to scp files over to the yum repo, however, I’m still stuck typing in a password. If you join your linux VMs to an active directory domain, this may not be an issue for you as your kerberos tickets will follow you around, but we’ll assume you’re not that lucky so we have something to do.
The hard way, but possibly more secure, would be to run our openssh keygen process above on every machine for every user and add the public key to hiera. This doesn’t scale well. X users, Y nodes, you’ll quickly have X*Y keys to manage. Revoking a key becomes tedious as well, you have to generate up to Y new keys.
Instead, we’ll look at host based authentication. By enabling this on your nodes, all users from specified nodes can ssh to the other specified nodes without a password. This requires working DNS (forward and reverse), some ssh configuration modifications, and a design decision to allow this communication. Our configuration will allow all users between all nodes, but you can narrow that down to users and groups if you’d like. The other thing we need, since we’ll be doing this via Puppet, is puppetdb. Thankfully, we already installed that. Our guide specifies three items, an shosts.equiv file and ssh host and client configuration. We’ll focus on the configuration first.
On the server side, we need to enable RhostsRSAAuthentication and HostbasedAuthentication. Let’s add that to our profile::base which spells out some other options. Be sure to branch your profile repo as well. Here’s the relevant portion:
  class { '::ssh::server':
    options => {
      'PermitRootLogin'          => 'yes',
      'Protocol'                 => '2',
      'SyslogFacility'           => 'AUTHPRIV',
      'PasswordAuthentication'   => 'yes',
      'GSSAPIAuthentication'     => 'yes',
      'GSSAPICleanupCredentials' => 'yes',
      'AcceptEnv'                => 'LANG LC_CTYPE LC_NUMERIC LC_TIME LC_COLLATE LC_MONETARY LC_MESSAGES LC_PAPER LC_NAME LC_ADDRESS LC_TELEPHONE LC_MEASUREMENT LC_IDENTIFICATION LC_ALL LANGUAGE XMODIFIERS',
      'Subsystem'                => '      sftp    /usr/libexec/openssh/sftp-server',
      'Banner'                   => '/etc/issue.net',
      'RhostsRSAAuthentication'  => 'yes',
      'HostbasedAuthentication'  => 'yes',
    },
  }
The client side changes are made in the same class:
  class { '::ssh::client':
    options => {
      'Host *' => {
        'SendEnv'                   => 'LANG LC_*',
        'HashKnownHosts'            => 'yes',
        'GSSAPIAuthentication'      => 'yes',
        'GSSAPIDelegateCredentials' => 'no',
        'HostbasedAuthentication'   => 'yes',
        'EnableSSHKeysign'          => 'yes',
      },
    },
  }
The last piece we need is the file /etc/ssh/shosts.equiv. This is where puppetdb comes into play. The saz/ssh module we use is using exported resources from puppetdb to realize the sshkeys from all puppet managed nodes on each node. This is the basis we will use to generate our file. We’ll create an exec to populate the file after ssh::knownhosts does its work. This exec is run every time, which slows down each puppet run, but it’s currently the best way I have to manage this (I’m all ears if someone has a better way!). Here’s the exec which we’ll add, also to profile::base:
  exec {'shosts.equiv':
    command => 'cat /etc/ssh/ssh_known_hosts | grep -v "^#" | awk \'{print $1}\' | sed -e \'s/,/\n/g\' > /etc/ssh/shosts.equiv',
    require => Class['ssh::knownhosts'],
  }
You’ll find that the output file is very wordy and likely has duplicates. You could pipe it through sort | uniq, but then you lose the ordering that helps you relate hostnames to IP addresses.
Commit your changes, push upstream, and redeploy. Running puppet against this environment should show all our specified changes and we can check the file it generates:
....
Notice: /Stage[main]/Ssh::Client::Config/File[/etc/ssh/ssh_config]/content:
--- /etc/ssh/ssh_config 2014-10-30 14:56:33.595904923 +0000
+++ /tmp/puppet-file20141030-4911-175447n-0     2014-10-30 16:06:44.856329783 +0000
@@ -1,7 +1,9 @@
 # File managed by Puppet

 Host *
+    EnableSSHKeysign yes
     GSSAPIAuthentication yes
     GSSAPIDelegateCredentials no
     HashKnownHosts yes
+    HostbasedAuthentication yes
     SendEnv LANG LC_*

Info: /Stage[main]/Ssh::Client::Config/File[/etc/ssh/ssh_config]: Filebucketed /etc/ssh/ssh_config to puppet with sum dc8e176896645889517c83214e690f4e
Notice: /Stage[main]/Ssh::Client::Config/File[/etc/ssh/ssh_config]/content: content changed '{md5}dc8e176896645889517c83214e690f4e' to '{md5}84bbc5eb5e9ac092547db91116dfee49'
Notice: /Stage[main]/Ssh::Server::Config/File[/etc/ssh/sshd_config]/content:
--- /etc/ssh/sshd_config        2014-09-22 22:23:55.627803019 +0000
+++ /tmp/puppet-file20141030-4911-2emast-0      2014-10-30 16:06:45.212404828 +0000
@@ -5,10 +5,12 @@
 ChallengeResponseAuthentication no
 GSSAPIAuthentication yes
 GSSAPICleanupCredentials yes
+HostbasedAuthentication yes
 PasswordAuthentication yes
 PermitRootLogin yes
 PrintMotd no
 Protocol 2
+RhostsRSAAuthentication yes
 Subsystem       sftp    /usr/libexec/openssh/sftp-server
 SyslogFacility AUTHPRIV
 UsePAM yes

Info: /Stage[main]/Ssh::Server::Config/File[/etc/ssh/sshd_config]: Filebucketed /etc/ssh/sshd_config to puppet with sum 1038629dbacf8f7cd04524cb6e4465c9
Notice: /Stage[main]/Ssh::Server::Config/File[/etc/ssh/sshd_config]/content: content changed '{md5}1038629dbacf8f7cd04524cb6e4465c9' to '{md5}c587f6cce01aeaadc96226aaa73ff936'
Info: /Stage[main]/Ssh::Server::Config/File[/etc/ssh/sshd_config]: Scheduling refresh of Class[Ssh::Server::Service]
Info: Class[Ssh::Server::Config]: Scheduling refresh of Class[Ssh::Server::Service]
Info: Class[Ssh::Server::Service]: Scheduling refresh of Service[sshd]
Notice: /Stage[main]/Ssh::Server::Service/Service[sshd]: Triggered 'refresh' from 1 events
Notice: /Stage[main]/Profile::Base/Exec[shosts.equiv]/returns: executed successfully
Notice: Finished catalog run in 1.93 seconds
[rnelson0@build ~]$ cat /etc/ssh/shosts.equiv
build.nelson.va_dsa
build.nelson.va
build
10.0.0.20
Run this on the yum node as well. You can now ssh between the two nodes without a password (yes, I’ll fix my spelling error now that it’s public!):
[rnelson0@build ~]$ ssh yum

This server is intented for use by the Nelson family. All other use is unauthorized.

Last login: Thu Oct 30 14:53:34 2014 from build.nelson.va
[rnelson0@yumrepo01 ~]$

[rnelson0@yumrepo01 ~]$ ssh build
CentOS release 6.4 (Final)
Kernel \r on an \m
Last login: Thu Oct 30 12:09:41 2014 from 10.0.0.200
[rnelson0@build ~]$
If things aren’t working properly, you can troubleshoot by stopping sshd on the server and then enabling debug mode on the server and client.
#SERVER:
[rnelson0@yumrepo01 ~]$ sudo service sshd stop
Stopping sshd:                                             [  OK  ]
[rnelson0@yumrepo01 ~]$ sudo /usr/sbin/sshd -d -d
debug2: load_server_config: filename /etc/ssh/sshd_config
debug2: load_server_config: done config len = 530
debug2: parse_server_config: config /etc/ssh/sshd_config len 530
debug1: sshd version OpenSSH_5.3p1
debug1: read PEM private key done: type RSA
debug1: private host key: #0 type 1 RSA
debug1: read PEM private key done: type DSA
debug1: private host key: #1 type 2 DSA
debug1: rexec_argv[0]='/usr/sbin/sshd'
debug1: rexec_argv[1]='-d'
debug1: rexec_argv[2]='-d'
Set /proc/self/oom_score_adj from 0 to -1000
debug2: fd 3 setting O_NONBLOCK
debug1: Bind to port 22 on 0.0.0.0.
Server listening on 0.0.0.0 port 22.
debug2: fd 4 setting O_NONBLOCK
debug1: Bind to port 22 on ::.
Server listening on :: port 22.

#CLIENT:
[rnelson0@build ~]$ ssh -vvv yum
OpenSSH_5.3p1, OpenSSL 1.0.0-fips 29 Mar 2010
debug1: Reading configuration data /etc/ssh/ssh_config
debug1: Applying options for *
debug2: ssh_connect: needpriv 0
debug1: Connecting to yum [10.0.0.252] port 22.
Check the references section for some troubleshooting assistance, and of course google will hopefully have results. If you receive gethostbyname errors, be sure to check your forward and reverse entries of BOTH sides – the debug information does not always make it clear what hostname is being looked up.
Once everything is working well, be sure to merge your changes back into master/production and deploy your environments so that all nodes can benefit from the changes.
Summary
You can now ssh from your windows desktop to your puppet managed node and between the puppet managed nodes. You can add new users to hiera without modifying your puppet code at all. You can restrict inter-node host based authentication further, to users and groups, if you desire. But what you don’t need to do is type your password in all the time! I hope this helps make navigation in your network a bit easier.
There’s one item we’ll have to look at later. Puppetdb will retain hostkeys forever until you start to tune it. If you destroy a node and build a new one with the same name, you’ll find two keys in your /etc/ssh/ssh_known_hosts for the hostname. This can clearly be a security gap as defunct node IPs could be re-used and end up with access to your network. You can review how to deactivate decommissioned nodes, but I’ll get to this eventually.
References
- http://itg.chem.indiana.edu/inc/wiki/software/openssh/189.html – ignore the reference to /etc/hosts.equiv

Thanks for the post. i want to be able to revoke ssh keys or set it to expire after a period. How can i achieve this?
The Puppet ssh key resources I do not believe allow for the flexibility you want. You can, however, set the ensure attribute to ‘absent’ to remove resources. I feel this is best done as a one-off, rather than in your regular manifests, or you risk after a few years go by having a very lengthy list of deleted resources that would never actually be present anymore, anyway.