I strongly believe that everyone needs a home lab in order to practice Continual Improvement of the self. I recently completed an upgrade of my own home lab, for those interested. This year’s upgrade was inspired partly by need after moving to a new house that lacked ethernet wiring and partly by Chris Wahl’s colorful network.
The Existing Lab
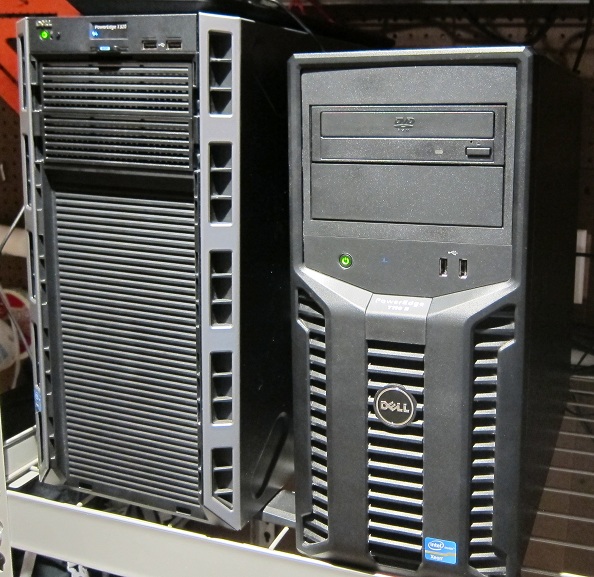
For the past years, my focus has truly been on virtualizing everything. The core of my lab are two Dell hosts running vSphere. The smaller is a 2012 PowerEdge T110 ii with a 4 core processor, 32 GB RAM (32 GB max), a single onboard NIC, and some local storage. The larger is a 2013 PowerEdge T320 with a 6 core processor, 32 GB RAM (96 GB max), dual onboard NICs, and some local storage. They are both single socket, but could take extra NICs or storage. The T320 could also have an iDRAC if I didn’t mind running downstairs once in a blue moon. They are currently running vSphere 5.5 and I will upgrade them in the next month or so.
 I don’t even know what the local storage is anymore, since they are both connected to a Synology DS214 with 2TB of storage made available via iSCSI. I run anywhere from 10-40 VMs at a time on these two nodes and storage and the only scarce resource is RAM. All of the devices are very quiet and low heat and can be located in an office closet without anyone noticing. In fact, they did sit in my home office closet for two years and I almost forgot they were there. There were no upgrades to the servers or storage this time around since I haven’t been close to capacity on either.
I also have a TP-Link 16 port switch (I can say it’s cost effective, but that’s it), a FortiAP 220, and a FortiWifi-80CM. The Fortinet equipment is pretty good but was getting long in the teeth. The switch stayed but the Fortinet equipment got an upgrade. Before I get into that upgrade, there was something else more significant to do.
No upgrades here, $0 spent so far.
Layer 2 Upgrades
The real upgrade of my home lab this year is at layer 2. Previously, the servers, switches, storage, and WAP all sat in a closet. Though it worked well in our previous house, it simply didn’t work in the new house we moved into last year – it wasn’t wired for it. With the help of a good friend (anyone who offers to wade through blown insulation in attic automatically qualifies as a good friend!), we got the job done.
If you ever look at wiring a finished house, you’ll find there are two problems. The problem most easily solved is how to get wires through the walls to the termination point. If you have an attic or a crawlspace, you cut a hole in the drywall, drill a hole in the sill or floor plate and feed the wire through till you can snag it at the termination point. Terminate the wire, attach the keystone to a faceplate, and you’ve got one end of the connection complete.
The other, more difficult problem is how to home run the wires. First, you need to figure out where you want the home run to go. Our house has a storage area by the furnace and water heater that has a large open area which isn’t too close to said water heater. Second, you need to get all the wires from the termination points to this home run location. If any of those points are on a different floor than your home run, you’ll need to find or make a chase between floors.
We lucked out! The builders, in their infinite wisdom and cost savings, ran a vent pipe from the furnace to the attic, but then used an alternative vent pipe in the basement, leaving an unused pipe that ran from the basement to the attic. We were able to cut a hole and run some wires in this space.
One issue I should note: Be careful cutting metal pipe in an attic! We were able to remove the cap in the basement and take it outside where we cut it with a multi-tool. There were sparks everyone. You do NOT want sparks in your fiberglass insulation in the attic! We settled on using the 2″ hole punch from a door handle set ($20 for a disposable hole punch vs $40 for a nicer bit/hole punch). This takes a lot longer but eliminates the sparking and keeps your house from burning down.
With luck on our side and a few hours in a really hot, claustrophic attic, we were able to home run ethernet drops into two bedrooms plus a 2nd floor WAP and a printer. On the home run side, we did some not-so-pretty termination on an adjacent wall to where the servers ended up, as you can see below. All the blue wires (interior runs) have labels on both ends and the punchdown panel is marked as well. You can also see the new FortiAP which I’ll discuss later.
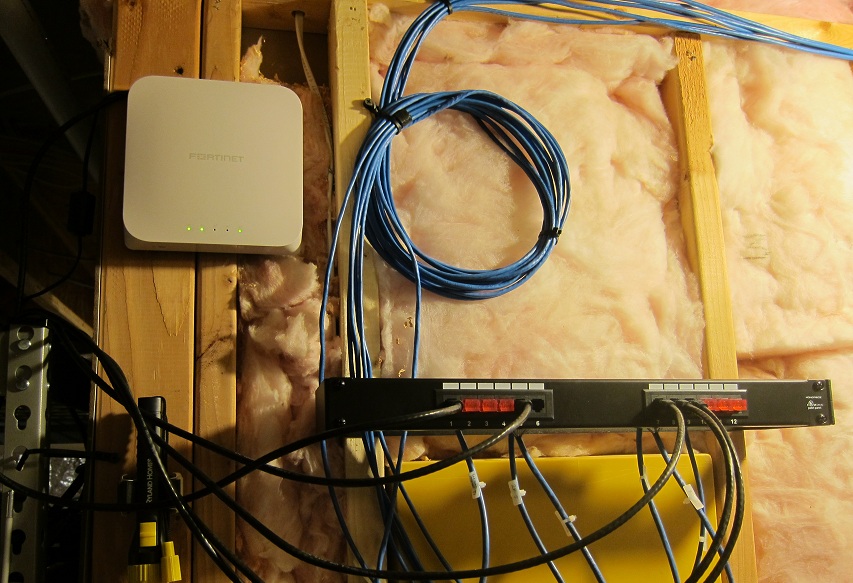
The home run equipment – panels, 1000′ Cat5e, keystones, wall plates, those fancy red dust covers, wire markers, and a boatload of patch cables – cost just under $300, mostly sourced through monoprice.com.
Special thanks to Mike for his assistance on this step of the project!
Server Rack
Next up was the server rack. This is a $100 kit from Home Depot, 24″x48″x84″, nothing special. I do wish that I had bought one with a solid surface, or cut out some plywood to place under my servers, as the rail spacing is not quite right for my equipment. You can see the servers and the Synology have a bit of tilt, but not enough that I’m worried about it.
Because this is an unfinished space, I did two things before assembling the rack. First, I ran two 20A circuits to that wall. The panel is on the opposite wall and I’ve run circuits before, so this was pretty easy. Each circuit is connected to 4 receptacles and I split my equipment between the two circuits – nothing has dual power supplies, but this should help ensure neither circuit trips if everything turns on at once. Second, I put some hardboard on the wall, over the insulation. The insulation is taped, not blown, but the server power supplies are close to the wall and if some fiberglass got sucked into a PSU, it would not be a good day. I did use a combination of pegboard and solid hardboard, simply because I already had some of each. The breakers, receptables, boxes, and pegboard cost around $75 from Lowes. A new UPS ran around $140 at Costco.
Even though this is located far enough from the water heater that it will not get doused if the tank explodes, it is in a basement that could flood. The UPS is on the 2nd shelf, servers on the 3rd, firewall and switch on the 4th, and a monitor on top. I think that’s high enough that I’ll have more significant concerns on my mind before the water gets to the lab equipment.
As a final step, I secured the rack to the wall by straps connected to the top corners of the rack. With the equipment that high, it’s a little top heavy and this will prevent it from coming down on top of me should I bump into it while accessing the rest of the storage area.

Costs were $100 for the rack, $75 for wiring and hardboard, and $140 for the UPS: $315 total.
Firewall Upgrades
As I mentioned earlier, the FortiWifi-80CM I had was pretty old. In addition to its age, it also only has 1 WAN port and 4 LAN ports. The new FortiGate 100D has dual WAN ports and 18 LAN ports. The older unit supported treating the LAN as a single switched zone or splitting it into 4 individual zones with a 1:1 mapping to ports. The newer unit allows me to split the switch into a 1:1 zone:port mapping OR to do 1:N zone:port mapping. I don’t use this feature (yet!) but I do take advantage of per-VLAN sub-ints. I trunk these VLANs to my vSphere hosts and do all my firewalling and routing on the FortiGate.
I also replaced the single FortiAP-220 with two FortiAP-320s. They are dual-radio units; I set one to 5.7 GHz with 802.11a/g/n and one SSID and the other to 2.4 GHz with 802.11b/g and another SSID for older devices like the PS3. One is in the basement, as pictured above, and the other is on the 2nd floor. This gives me great coverage in the house. The Fortigate-100D also includes a Wireless AP controller, making roaming very effective. I have the same SSID on both APs and the handoff is very smooth. The logging and troubleshooting for wireless in the FortiGate GUI is superb, it’s very simple to troubleshoot any issues you have. They aren’t the fastest units on the market but the other pros far outweigh that con – they’re still much faster than my internet connection or 802.11b/g of yesteryear.
The FortiGate and FortiAPs can all get updates from FortiGuard, Fortinet’s online suite of services that includes URL Filtering, Threat Detection and Prevention, and other UTM features. As long as you have a valid support contract, upgrading a device is 2-3 button clicks away. There’s never a need to download firmware on your own.
The only downside to the 100D is that it has fans, which means it whines. I would not suggest putting one in your office closet, it will get to you very quickly.
In the picture below, you can clearly see the red/black color scheme Chris Wahl used that I do so adore. Red goes to servers, storage, and network devices; black goes to user endpoints. Unfortunately, some of the RJ45 ports are just a little too small for the dust covers.

Pricing can vary a lot on these units, by country and reseller. Do your own research here and talk to the vendor if you have a relationship with them already. Fortinet does make virtual firewall appliances as well.
Your Own Home Lab
Not a bad deal for ~$600 plus some Fortinet equipment. I had a lot of fun upgrading my lab this year and I hope you enjoyed reading about it. I’d love to hear what kind of fun things others are doing in their home labs. Drop a line in the comments or find me on twitter!
Parts
- R.J. Enterprises RJ45 Jack Dust Covers (100pc) – Red. Black, Blue, Orange, Yellow, Green, Violet also available
- Marker Cable Tie (100pc)
- Cat5e, Patch Cables, Faceplates, Keystones, etc. – Monoprice.com
- UPS – Costco (size to need)
- Rack – Home Depot, Lowes (size to fit)
- Servers – Dell
- TP-Link – I recommend just about anything else
- FortiGate/FortiAP – Find a Reseller

Love this setup. This was written ages ago I know, came across it when reading bits on Google. I think the 100D is probably overkill but so is the PC in my setup I am running the Hyper-V on.
I live in a large bungalow so one 220B AP at each end of it to give full coverage and a FGT60C provifing the controller and firewalling. I do not license it for web filtering etc as I do not need it, but with the hardware acceleration on by default I can pump my 200Mb through it no problem with AV and IPS turned on. (Signatures downloaded and applied to the unit manually from Fortinet)
I then run Windows 2012 Pro with Hyper-V.
12 Core I7
64Gb Ram (WAAAY TOO MUCH)
2TB Disk for VM’s
1SSD for the PC and Windows 2012
All in all not too different from this, but I do not have any form of resilience in VM’s as uptime is not massively important. An online backups means I can restore bits should the worst happen, but I mainly use hyper-v for labbing scenarios now.