vCenter 6 permissions model changes

If you have not yet upgraded from vCenter 5.5 to 6, you may want to give it a shot. vCenter 6 is much faster and introduces a lot of nice UI improvements. One of my favorites is the relatively minor change that when you delete a VM, it displays the VM name in the dialog instead of “this object”. In any case, it’s pretty swanky and I think you’ll like it.

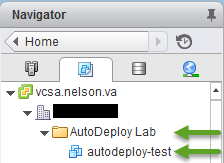
However, there is one extremely noticeable, but (in my opinion) poorly documented change, in the permissions model for non-Administrator users and groups. In 5.x, you could assign user rights to a folder or VM and the user would be granted the proper level of access to the folder members or the individual VM. If this was your folder layout…

vCenter 6 Permissions 1

…and you wanted to grant Virtual Machine Power User access to the VM autodeploy-test, you could grant that permission to a user or group on the folder or VM here and the user could manipulate their VM just fine:

vCenter 6 Permissions 2

After upgrading to 6.0, the same user would not have permission to access the folder or VM. They might simply see Empty Inventory when looking at the VM and Templates view. To remedy this, you need to grant non-propagating permissions at the intermediate Datacenter tier (you do NOT need to grant permissions to the vCenter object). These permissions can be as limited as read-only in most cases, but as they are not propagating, you can use the same permission level (e.g. Virtual Machine Power User). The new permission is highlighted in red:

vCenter 6 Permissions 3

If you have multiple intermediate folders, you’ll need to assign the non-propagating permissions at every level. You’ll need to do the same on the Hosts and Clusters, Datastores, and Network views as well. In an additional wrinkle, Network view permissions for Distributed vSwitches cannot be assigned on the DVS, they need to be assigned on a folder containing the DVS and optionally on an individual Distributed PortGroup.

I have heard rumors that this new “feature” may be fixed soon, but until then, these changes are required for non-Administrator users to maintain their permission levels.

Speeding up Travis CI with Containers

Another quick Travis CI post. Travis CI now supports containers, which means potentially faster builds. There are two lines you can add to your .travis.yml:

sudo: false
cache: bundler

The first enables the container infrastructure. The second caches dependencies for a Ruby project. Travis CI has articles on the new architecture and caching content and dependencies that provide more detail if you need it. I didn’t see as much of a speedup with caching, but enabling containers definitely made it faster.

Allowing expected failures with Travis CI

Recently, I started setting up my puppet modules with Travis CI. One thing that bothered me was that once I added a new version to the matrix, it had to pass with that version or the PR would have a red mark. Today, I found out how to ignore those new versions with the allow_failures key in the matrix hash of .travis.yml. For instance, if I am currently testing up to Puppet 3.7.0 and I to start testing with 3.7.0 future parser and 4.0.0, I add the new versions to the env hash and the matrix‘s allow_failures key. The new lines are in bold:

---
sudo: false
language: ruby
branches:
  only:
    production
bundler_args: --without development system_tests
script: "cd dist/profile && bundle exec rake test"
notifications:
  email: false
rvm:
  - 1.9.3
  - 2.0.0
  - 2.1.0
env:
  - PUPPET_GEM_VERSION="~> 3.3.0"
  - PUPPET_GEM_VERSION="~> 3.4.0"
  - PUPPET_GEM_VERSION="~> 3.5.0" STRICT_VARIABLES=yes
  - PUPPET_GEM_VERSION="~> 3.6.0" STRICT_VARIABLES=yes
  - PUPPET_GEM_VERSION="~> 3.7.0" STRICT_VARIABLES=yes
  - PUPPET_GEM_VERSION="~> 3.7.0" STRICT_VARIABLES=yes FUTURE_PARSER=yes
  - PUPPET_GEM_VERSION="~> 4.0.0" STRICT_VARIABLES=yes
matrix:
  exclude:
  # Ruby 2.1.0
  - rvm: 2.1.0
    env: PUPPET_GEM_VERSION="~> 3.2.0"
  - rvm: 2.1.0
    env: PUPPET_GEM_VERSION="~> 3.3.0"
  - rvm: 2.1.0
    env: PUPPET_GEM_VERSION="~> 3.4.0"
  allow_failures:
    - env: PUPPET_GEM_VERSION="~> 4.0.0" STRICT_VARIABLES=yes
    - env: PUPPET_GEM_VERSION="~> 3.7.0" STRICT_VARIABLES=yes FUTURE_PARSER=yes

Now, when Travis CI runs, it will add the new versions to the match and will mark the designated versions separately as Allowed Failures. You can see this in action with puppetinabox/controlrepo build #22, which contains expected failures and so is considered a passing build. I can now develop against my supported versions and test against new versions, without affecting my test results. This has solved a pretty big frustration for me. Hopefully, it helps you as well!