As I’ve worked through setting up Jenkins and Puppet (and remembering my password!), I created a job to automate rspec tests on my puppet controlrepo. I am sure I will go through many iterations of this as I learn more, so we’ll just call this version 1.0. The goal is that when I push a branch to my controlrepo on GitHub, Jenkins automagically runs the test. Today, we will ensure that Jenkins is notified of activity on a GitHub repo, that it spins up a clean test environment without any left over files that may inadvertently assist, and run the tests. What it will NOT do is notify anyone – it won’t work off a Pull Request and provide feedback like Travis CI does, for instance. Hopefully, I will figure that out soon.
The example below is using GitHub. You can certainly make this work with BitBucket, GitLab, Mercurial, and tons of other source control systems and platforms, but you might need some additional Jenkins Plugins. It should be pretty apparent where to change Git/GitHub to the system/platform you chose.
Creating A Job
From the main view of your Jenkins instance, click New Item. Call it whatever you want, choose Freestyle project as the type, and click OK. The next page is going to be where we set up all the parameters for the job. There are tabs across the top AND you can scroll down; you’ll see the same selection items either way. Going from the top to the bottom, the settings that we want:
- General
- Discard old builds – enabled. Choose Log Rotation and your preferred retention periods. I choose 7 days and 20 builds. You can click on Advanced… but we aren’t building artifacts so that won’t help.
- GitHub project – enabled. Enter the controlrepo URL in the format https://github.com/USERNAME/controlrepo.
- Source Code Management
- Git.
- Enter the Repository URL. We’ll come back and add a credential soon.
- Branches to build: **. You can restrict it if you want.
- Git.
- Build Triggers
- Build when a change is pushed to GitHub – enabled
- Poll SCM – enabled
- Build Environment – nothing. We will use RVM but not this way.
- Build
- Add an Execute Shell step with the following contents:
#!/bin/bash
[[ -s "$HOME/.rvm/scripts/rvm" ]] && source "$HOME/.rvm/scripts/rvm"
# Use the correct ruby
rvm use "2.1.9@puppet"
gem install bundler

git clean -ffdx
bundle install --path vendor --without system_tests
bundle exec rake test
Click the tiny image to see what the job looks like.

When Jenkins detects a change being pushed to GitHub, it will check out the relevant commit/branch into the test environment before executing the shell script. The script enables rvm and uses version 2.1.9 of ruby with a gemset called puppet. I’m honestly not entirely sure how the gemset helps here, but I was advised to use one by multiple people. The script then ensures bundler is installed and that all files not part of the git repository are purged (git clean). It then proceeds to install gems via bundler and run the rake tests using the bundled gems. If your tests are slightly different, just replace everything after git clean with the commands you require.
This will happen on every change it detects. It will keep up to 20 builds for up to 7 days. It’s actually pretty simple. We just have one more thing to do to complete the job, create our credential and attach it.
Credentials
There is more than one way to manage credentials, I managed mine using the System credential store. Go back to the main page of Jenkins and then Credentials -> System -> Global credentials (unrestricted). It’s probably fair to say this is not the most secure way to do this, but I haven’t plumbed the depths of Jenkins security yet. Click Add Credentials on the left. The kind is SSH Username with private key, the username is jenkins (but can be whatever you want), and the Private Key is From the Jenkins master ~/.ssh. Leave the passphrase and ID alone and fill in a Description if you’d like and hit OK.
Now, ssh into the server and run sudo -u jenkins ssh-keygen. This will populate ~/.ssh/id_rsa and ~/.ssh/id_rsa.pub. Cat the public file and store it in your clipboard. Go back to your job, click Configure on the left, and select the credential in the Source Code Management section. Next, visit your controlrepo’s Settings page and select Deploy Keys. Add a deploy key, paste in the public key’s contents, and save the job. If you don’t give it a title, it will choose the user@host tag at the end for you. I gave my key write access in anticipation that it may need it to update PR status, though the description says it’s for push privileges – since I haven’t gotten that far yet, I can’t say it’s necessary. Click Add Key when done.
Build Your Job
Yay, we have a job that should work! Go back to the job page in Jenkins and click Build Now. In the Build History you’ll see your job show up. With any luck it will be a flashing blue dot which means it’s working. If it goes straight red, we have a problem. Either way, click on the build. You won’t see too much until you select Console Output on the left.
If it went straight to red, here’s your chance to figure out why. Perhaps you forgot to save the job after attaching credentials, or typed in the wrong git repo URL, or any of a million other things. You can hopefully debug this on your own. I’ve lost the initial job history since I only retain 20, whoops, so I can’t offer up any problems and fixes I ran into directly, sorry. Fix whatever problems you find, go Back to Project in the top life, and start another build until it finally goes blue and stays that way for a while.
Once your build goes blue, you should see something similar to this:
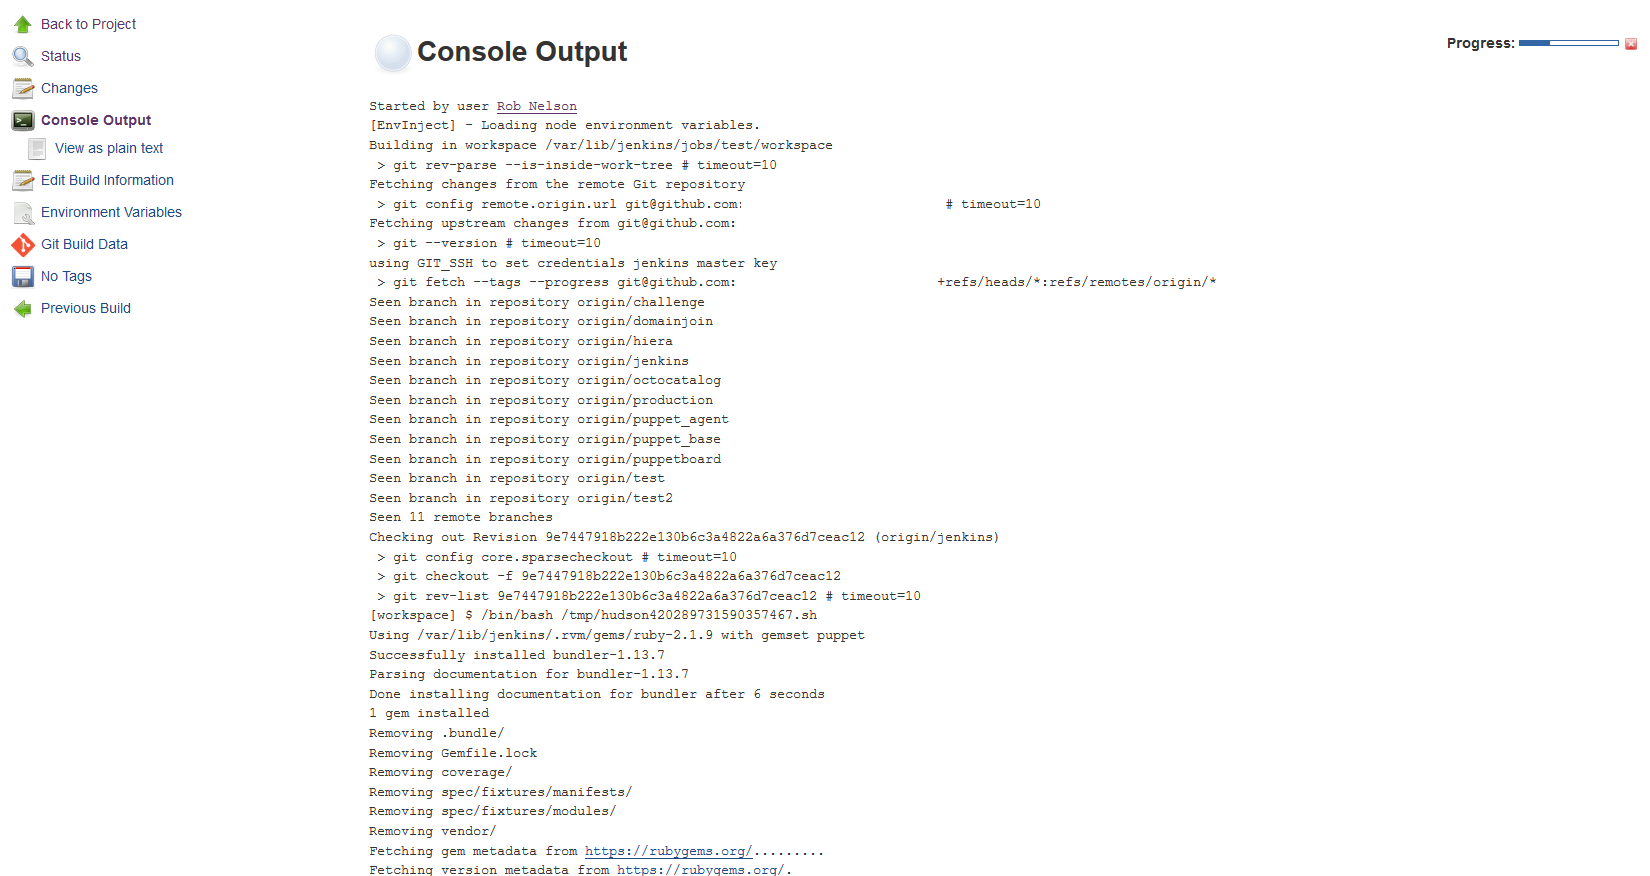
You can see git running to check out the last revision that was made to the controlrepo (automated builds will be based off the specific change that is seen from GitHub) followed by the activities of the bash script. Hopefully, this looks like you running your rspec tests locally, with a few weird ASCII color codes embedded in it, followed by Finished: SUCCESS. Hurrah! Of course, if your commit failed, you’d see Finished: FAILURE – but still a “success” from the viewpoint of our build actually completing.
Automated Polling
We now have at least one instance of a manually initiated build successfully completing. This is great, but we don’t want to have to jump in here and click Build Now every time. There are three more things we need to fully automate builds: an additional user for the github integration, inbound Internet access for Jenkins and a Webhook. Log out or open a new web browser and sign up for a user called github with a password of your choice. We’ll use that in a moment.
You’re going to be on your own for the inbound access as you know your network best. You just want to open the http interface of your Jenkins to GitHub. In my case, this means a NAT for port 8080/tcp, and of course, configuring Jenkins security to prevent user sign ups and disable anonymous access. If you can narrow inbound access to the IPs of GitHub, even better. Make sure you can access Jenkins remotely before proceeding.
The webhook can be configured on the controlrepo settings page, same place we found the deploy keys. Even though it’s a webhook, click on Integrations & Services – some webhooks are more equal than others! Add a service Jenkins (GitHub plugin), NOT the Git plugin! You’ll be prompted for your GitHook authentication before continuing. You’ll notice that now it shows Webhook on the left, to prove that this is indeed just a webhook. The Hook URL will look like this: http://:@rnelson0.synology.me:8080/github-webhook/, using the github account info we created earlier. You can click Test Service in the top right. It’s .. not as helpful as I’d like. It just sits there, staring at me. But if you run a packet capture on your firewall or jenkins node, you should see some traffic coming in to your public IP and then sent to the Jenkins node and seen there.
For the real test, go into your controlrepo and make a commit. It doesn’t need to be real, this will suffice: git checkout -b test; touch test.txt; git add test.txt; git commit -am 'test commit'; git push origin test. You should see the packets fly in the packet capture and then a job start in Jenkins!

We now have a working Jenkins job. Commit, push, tests run. Hooray! I’ll be coming back shortly to figure out how to get it to work with Pull Requests, and eventually to visit Pipeline jobs as well. Let me know if you get this working in the comments!

You should have a look at https://jenkins.io/doc/book/pipeline/jenkinsfile/ (so it can create/modify the job from the github repo itself, like travis can) – and with https://jenkins.io/doc/book/pipeline/ – it can be made to lots of interesting stuff 🙂