Many wise people have pointed out that a backup doesn’t count until you can restore it. It’s vitally important that we test our backups by restoring them, and doing so manually is often problematic when the original system is still online. If you use Veeam Backup & Replication, it includes functionality called SureBackup to automatically test restores in a private, isolated network so that there’s no conflict with the production systems. You can read more about the functionality in the B&R Manual, starting with this section. I will be providing high level descriptions here as the manual already provides great detail, please take the time to read that as my article isn’t a substitute for the official docs!
The manual is pretty good, but I ran into a few things that were either confusing or missing, things I had to scramble to figure out on my own. That’s not fun and I don’t think others want to waste their time on it. I hope this article helps illuminate some of the gaps for others who wish to explore SureBackup. Let’s start by taking a look at how SureBackup works and the components it uses.
SureBackup, Application Groups, Virtual Labs, and other terminology
The basic process of SureBackup is as one might expect:
- Register and power on a VM based off the backup files
- Run tests against the VM
- Optionally perform a CRC check on the files
- Add the status of the VM to the report
- Power off and unregister the VPN
- Repeat 1-5 for the remaining VMs
Under the hood, of course it’s a little more complicated and introduces some new terminology:
- Application Groups: A collection of related VMs. For example, an Active Directory Domain Controller, a domain-joined DNS server, and a domain-joined webserver. Or the trio of VMs a 3-tiered application. Only create an application group for VMs that need tested in a particular order or need extra tests. Each VM can have a defined role to run application-level tests and are powered on one at a time in the order specified.
- Linked Job: A restore test can, after any Application Group VMs pass, run against all the VMs in a Backup or Replication job. These tests are basic power on and heartbeat tests, no application-level tests. These VMs are powered on in groups, by default 3 at a time.
- Virtual Lab: Each job is run against or inside of a virtual lab. This is where the network isolation occurs. The Lab is attached to a single VMHost, not a cluster, and a standalone vSwitch with no uplinks is created on that VMHost to provide the isolation. A datastore is chosen for the temporary files used during the test. The production and isolated networks are bridged by at least one VM called a…
- Proxy Appliance: Not to be confused with a Backup Proxy! This linux-based VM bridges the production and isolated networks using iptables and NAT masquerading to allow access to the restored VMs. It is managed entirely by Veeam, including creation, settings, powering on and off, etc.
- SureBackup Job: A new job type in addition to Backup and Replication jobs. This option is not visible until a Virtual Lab exists.
Now that we know the various components, let’s expand the high level steps from before:
- A SureBackup Job starts and brings up the Virtual Lab and its Proxy Appliance[s].
- Pick the first VM from an Application Group or the first 3 VMs from a Linked Job. Register and power on a VM and run heartbeat and/or application tests against it. Tests are initiated from the Backup Server through the Proxy Appliance’s NAT and to the test VM.
- Optionally perform a CRC check on the files.
- Add the status of the VM to the report
- Power off and unregister the VPN
- [New] If the VM is a member of an application group and has failed, abort the run
- Repeat steps 1-6 for the remaining VMs, moving from Application Group VMs to Linked Job VMs.
- [New] Clean up all the temporary restore VMs and power off the Virtual Lab
We can optionally allow the VMs to persist after the SureBackup Job completes. In that case, the job actually remains running until we select it in the Console and choose to Stop Session, at which time step 7 completes. If we turn off the VMs manually, it doesn’t hurt anything, though; Veeam still handles the cleanup
Create an Application Group
An application group is defined when we want to test a number of related VMs, such as a 3-tier app or an Active Directory/Exchange setup. We do not create application groups for unrelated VMs, like 5 web servers from 5 different customers. The reason is that each VM is powered on (and left on!) in sequence, and if one fails the whole group fails. Make sure there’s a strong relationship between the VMs in an application group.
Creating an Application Group is a pretty simple process with the wizard. In the Console, go to Backup Infrastructure > SureBackup > Application Groups, right click and choose Add App Group…

Give it a name and description and click Next. On the Virtual Machines page, click Add VM and select one or more related VMs. I’ve chosen an instance of vRealize Operations Manager (vROps). Notice that the Role is not set. Select it and click Edit… Adding a role will enable an application-level check. Select the Web Server option. In the Startup Options tab, we need to make a change. vROps takes a long time to start, more than most web servers. I suggest increasing the Application initialization timeout to 300-400 seconds (5:00-6:40) so it has enough time to complete loading. Switch over to the Test Scripts tab and there is a small problem – the Web Server role uses port 80! If we highlight it and edit it, we cannot change the argument, we can only choose a different application or provide our own test script.
There are two ways to fix this. First, we can create a new role, which means we only have to describe the tests once and can re-use it across anything that fits the role. On the Backup server, browse to %ProgramFiles%\Veeam\Backup and Replication\Backup\SbRoles and we find one XML file for each role. Copy WebServer.xml to HTTPSServer.xml or similar and edit that file. There are three things to change: the Id and Name at the top and the Arguments about 2/3rds of the way down. I’m not aware of any specific rules for the Id generation, just that it should be unique. I changed the last F to an E, that’s all. The Name is what shows up in the Veeam dialog boxes. Here’s what mine looks like with the edits in bold:
<?xml version="1.0" encoding="utf-8" ?>
<SbRoleOptions>
  <Role>
    <SbRole>
      <Id>4CDC7CC4-A906-4de2-979B-E5F74C44832E</Id>
      <Name>HTTPS Web Server</Name>
    </SbRole>
  </Role>
  <Options>
    <SbVerificationOptions>
      <ActualMemoryPercent>100</ActualMemoryPercent>
      <MaxBootTimeoutSec>300</MaxBootTimeoutSec>
      <AppInitDelaySec>120</AppInitDelaySec>
      <TestScripts>
        <TestScripts>
          <TestScript>
            <Name>Web Server</Name>
            <Type>Predefined</Type>
            <TestScriptFilePath>Veeam.Backup.ConnectionTester.exe</TestScriptFilePath>
            <Arguments>%vm_ip% 443</Arguments>
          </TestScript>
        </TestScripts>
      </TestScripts>
      <HeartbeatEnabled>True</HeartbeatEnabled>
      <PingEnabled>True</PingEnabled>
    </SbVerificationOptions>
  </Options>
</SbRoleOptions>
If we OK the Verification Options window and click Edit… again, we will see the new role HTTPS Web Server is available and the Test Scripts tab shows the port 443 in the arguments. More information on role definitions can be found in the manual.
The second way to configure the test scripts is on the Edit page by selection Use the following test script. Put something in the Name field. The Path is the TestScriptFilePath observed in the XML files plus the full path, giving us C:\Program Files\Veeam\Backup and Replication\Backup\Veeam.Backup.ConnectionTester.exe (assuming %ProgramFiles% is C:\Program Files). The arguments match the same field in the XML file, %vm_ip% 443 – or whatever port the one-off requires. We can also add our own binaries for testing, just make sure they’re documented as part of the Veeam B&R Backup server build.
Our single-VM example application group looks like this now:

There are tons of other things to customize in the application group – such as only allocating 50% of the compute and memory the VM is assigned to preserve resources during the test – but this is sufficient for our tests. Create however many application groups you want to now, you can always come back later and edit them or create more.
Create a Virtual Lab
The application group was the easy part. The Virtual Lab is next, and will create a vSwitch and Proxy Appliance VM on the host/datastore of our choosing. Before beginning, we need to decide which host and datastore to use, and grab an IP for the Proxy Appliance on the same network as the Backup server (it can be set up in a different network, but that’s a more complex setup I won’t be visiting in this article). Once we have that, we go to Backup Infrastructure > SureBackup > Virtual Labs, right click, and choose Add Virtual Lab… If a Virtual Lab has been created previously and disconnected somehow, we can also choose Connect Virtual Lab… to reconnect it. Let’s review creation of a new lab.

Give the lab a name and description. On the next page, we are asked to select a host. Again, we can NOT choose a cluster, we must choose a single host. Once we choose the host it will suggest a Folder and Resource Pool that the restore VMs will be placed in. We can edit with the Configure…button or just click Next. The next page in the wizard asks for a Datastore that the host can see, click Choose… and select one. I believe I saw a suggestion that the free space should be about 10% of the size of the VMs being restored, but I am not sure where I saw that and cannot find a more solid recommendation now.
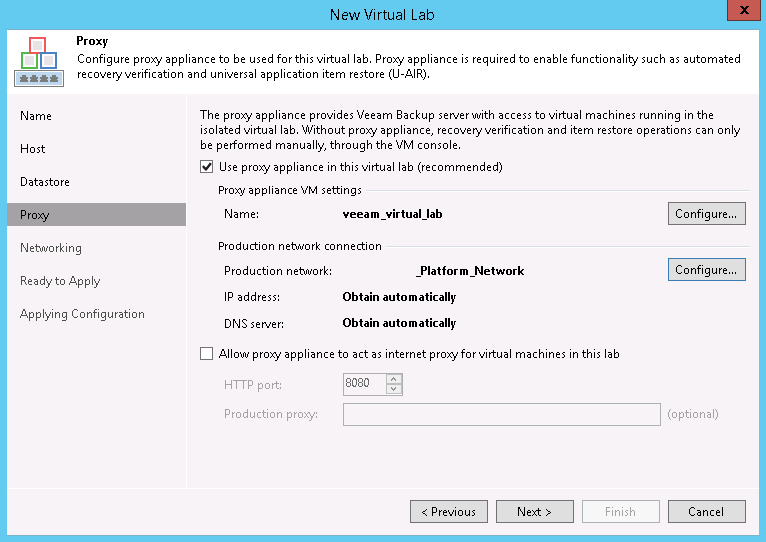
The next page is where the Proxy Appliance is created. Set the name with the first Configure… and the network settings with the second Configure… In network settings, wemust choose the same production network as the B&R Backup server for our simple setup (more advanced options are discussed in the manual as Advanced multi-host (manual configuration) but there are no guides for it, sorry). If that network supports DHCP, just click OK, otherwise we will need to provide our IPv4 (no IPv6 availability) address settings and DNS servers. We can also optionally allow the proxy appliance to be the VMs internet proxy, but we will skip that for now (directions in steps 4 and 5 here).
Note: The proxy appliance by default receives the same name as the lab. If you use vCheck, there is a plugin that alerts on VMs whose file location on the datastore doesn’t match the VM name, and spaces in VM names are changed to underscores on the filesystem. If you use this plugin, I suggest avoiding spaces in the VM’s name or adjusting your plugin settings to skip the virtual lab VMs to prevent false positives.
On the Networking tab, choose Advanced single-host (manual configuration). You can read up on the networking modes. Our use case calls for tests of VMs in multiple networks, so we must choose the Advanced/manual option. If the restored VMs are all in a single network, then the Basic/automatic mode will work. Click Next to start setting up the Isolated Networks.
The next tab is where we will add the various networks that restored VMs will exist in. We will add some now and we will need to return here in the future when more networks are added. There are unfortunately no cmdlets or functions in the Veeam PowerShell kit to do this… yet. There will be one Isolated Network already.
Update: When I read the documentation, I assumed you needed an isolated network for every production network that a VM in the job uses (i.e. if your VMs were on VLANs 100-110, you needed 11 isolated networks and vNICs), which is not quite true. If no isolated network/vNIC exists that matches the production network for a VM, only Heartbeat and Verification tests are attempted. If an isolated network/vNIC does exist, then Ping and Script tests are attempted as well.

If we select that network and click Edit, we can see how it is associated with a Production network, an Isolated network, and a VLAN ID. This first Isolated Network defaults to the same network of the Proxy Appliance itself. It might be difficult to read through the scrubbed image, but the Isolated Network name is the Production Network name prepended with the lab name.

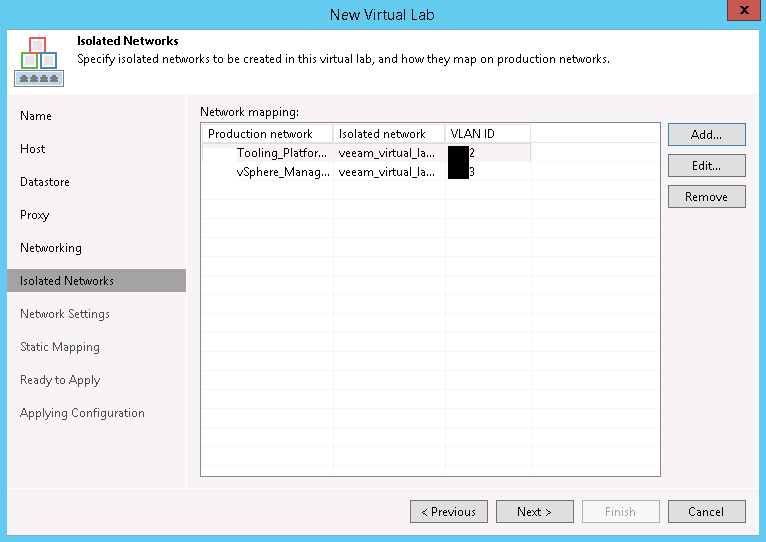
This network will be added to a private vSwitch on the selected host, which will have no uplinks. We should be perfectly fine leaving the VLAN ID alone, but if you are worried, just assign it a unique number not used elsewhere, maybe add 500 or 1000 to it. Click OK or Cancel and back on the Isolated Networks page of the wizard, click Add… We will need to Choose… a production network. In the dialog box, be sure to expand the host our appliance is in – if it’s a dvSwitch it SHOULD be the same everywhere, but there’s no point in chancing some identifier of a different host conflicting. In figure 7, I’ve chosen the vSphere Management network as that’s where vROPs resides.

Do not just change the VLAN ID and click OK! Take a look at the Isolated Network. I know it’s difficult to see with my scrubbed image, but it’s the same name as the previous isolated network. Click OK and the VLAN ID of both isolated networks are the same. An edit to either will update the ID for both. This isn’t what we want. The isolated network name needs changed. We can make it match the default format of <virtual lab name> <Production network name> or just <Production network name> or just enter free text like Bob. It doesn’t matter what it is called as long as it’s unique. Now, I cannot explain why the wizard doesn’t automatically change the name of the isolated network, but it doesn’t, so we have to do that ourselves. Big tip of the hat to Jason Ross who described the issue and fix in the Veeam forums. Once the Isolated Network is renamed, and click OK and the mapping will look something like this:
Next up is the Network Settings page. Here we want to create a vNIC for each Isolated Network we’ve created. Veeam uses NAT masquerading to let the Backup server communicate with the VMs on that segment, which requires selecting some address ranges that aren’t used elsewhere in the network, or at least that the Backup server doesn’t need to communicate with. Though we chose a manual network mode, a route to the masquerade IPs will automatically be created on the Backup server during restore jobs, so we do not have to manage that (this is why we did not put the proxy appliance in a different network than the Backup server). Edit the existing vNIC and assign it the IP/mask that the default gateway (router) in that network would have. We can also change the masquerade network and disable DHCP if we don’t want to use it on that interface. I would leave it enabled unless one of the VMs being restored is a DHCP server, otherwise it makes it real easy to ensure VMs get IP addresses. Here’s what that would look like for a network X.Y.10.64/27:

Repeat this for every Isolated Network you need, using the Choose isolated network to connect this vNIC to pulldown to select the correct isolated network. If we need VMs to talk to each other, check the Route network traffic between vNICs. If we don’t need it, it probably won’t hurt, though. Here’s what this might look like when complete.

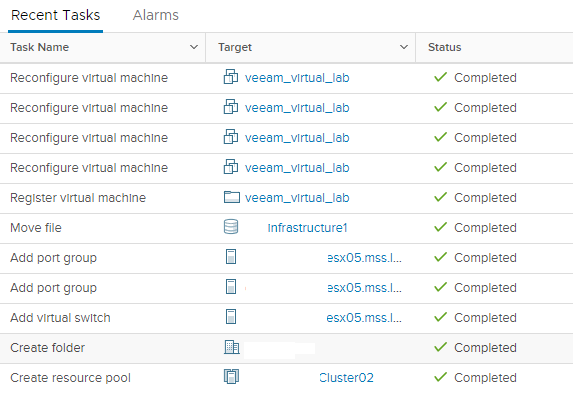
We are going to skip Static Mapping, as the general NAT Masquerade works for this use case. Review the configuration on the Ready to Apply portion of the wizard and hit Apply. When we do, the resource pool, folder, vSwitch, port groups and virtual machine will be created and configured on the specified host. We can now find the proxy appliance VM (or the other resources managed) and add any notes, tags, etc that we would normally apply to those resources (I use tag-based backups so would want to put a NoBackup tag on the proxy appliance).
If you need more assistance on creating a virtual lab, I recommend this Whiteboard Fridays video.
Create a SureBackup Job and test
Finally, we need to create a backup job. We are almost there, I promise! Go into Backup & Replication > Jobs > SureBackup (this is only available if one or more virtual labs exists) and right click to create a new job with Surebackup…

Give the job a name and description and click Next. On the next page we must select a virtual lab. In this case, there is only one. Click Next. On the next page we may optionally select an application group. The next page in the Wizard is for Linked Jobs. Let’s take a moment to explore the three combinations available here:
- Application Group only: The VMs inside the application group are powered on, one at a time and in serial order, then tested. Any VM test failure aborts the run immediately
- Linked Jobs only: The VMs in the linked jobs are started up in batches (default: 3 at a time) until all VMs are tested. Any VM test failure does not abort the run.
- Application Group and Linked Jobs: This a combination of the two above. The Application Group is processed as a unit and then, if it completes successfully, the Linked Job VMs are tested.
Since we created an application group, we will select it. We cannot edit the application group settings from here, only view them to ensure we select the correct group. We may choose to check the Keep the application group running after the job completes box. If so, the job will remain at 99% with all application group VMs and the Proxy Appliance VM powered on until someone right clicks on the job and chooses Stop Session. As described below, this is good for checking out any of the VMs in greater depth after the job completes. It would obviously not be something to leave enabled on a scheduled job. It is important to note that the VMs will only be kept running if the job completes successfully; if it fails, I observed the VMs being shut down immediately. So, it’s not great for troubleshooting. Click Next to proceed.
We can now link one or more Backup jobs to the SureBackup job by clicking the Add… button and selecting a job. We can only specify ONE role for all VMs in the linked job. If left blank, only a ping and heartbeat test will be used. At the bottom, we can specify how many VMs are processed at once. I did not play with the Advanced button but I believe we can use it to set roles by individual VM name, tags, folders, etc. Be aware that each VM will attempt to connect to an isolated network on the virtual lab’s vSwitch. If the backup jobs are by network, the lab can get by with a single isolated network, but if the job contains VMs from multiple networks, each one needs to exist beforehand or the job will fail. Click Next when ready to proceed.
The Settings page is where you specify to send SNMP or email notifications and determine if CRC checks are performed on the backup files. I only received emails in my testing for failed jobs; there appears to be no exposed setting for whether or not to send emails on successful job runs. CRC checks do take a while but I would recommend to avoid bit rot unless there is some sort of detection in the storage array or you’re a gambler.
Clicking Next takes us to the Schedule tab. If we check Run the job automatically we can have it run on a daily or monthly schedule, or have it run after a job – perhaps the Linked Job or a job that the Application Group VMs are backed up in. If some VMs come from a different job, leave If some linked backup jobs… checked and adjust the timer as needed.
Here’s what a successful job run looks like, with a little scrubbing, anyway:

Highlights and Observations
OK, that was a LOT we went through, very chewy. I have tried to highlight the most important items that I did not find in the B&R manual, including some I already covered above. I am also new to SureBackup myself and hope that if you see any incorrect information or workarounds, you will let me know in the comments or on twitter, specifically the affinity issue with the Proxy Appliance.
- You need at least a Virtual Lab to create a SureBackup Job. Application Groups are optional, but are a quick way to get started.
- Application Group VMs are processed in serial in the order specified. A single failure aborts the entire group.
- If there is no existing role for a VM, you can create your own with an XML file. Existing roles are at %ProgramFiles%\Veeam\Backup and Replication\Backup\SbRoles.
- Virtual Labs are tied to a single VMHost/Datastore and cannot be attached to clusters.
- The Proxy Appliance VM is normally powered off so is mostly exempt from DRS. However, it can be moved during an HA event. Veeam does not appear to create an affinity rule to keep it in place. It also doesn’t quite notice when starting up the Virtual Lab that the VM isn’t on the same host as the vSwitch and jobs will continue to fail until you vMotion it back. Hopefully this is something Veeam is addressing; in the meantime I created a DRS rule on my own.
- Spaces in the proxy appliance name are converted to spaces in the folder name on the datastore; at least one vCheck plugin will alert on this discrepancy between name and folder.
- Place the Virtual Lab’s Proxy Appliance in the same network as the B&R Backup Server (not the Proxies or the Console, if the Console is separate from the Backup) and masquerade routes are added automatically; if you place it elsewhere, you must manage the routing from the Backup to the Proxy Appliance yourself.
- Isolated networks are attached to a vSwitch with no uplinks. You should be able to use the same VLANs as you use in production, although someone could add an uplink to it. Adding 500 or 1000 to the VLAN number to put it in a range you don’t use may help prevent accidents.
- The New Virtual Lab wizard’s Isolated Networks Add dialog does not automatically change the Isolated Network name; you must change it manually.
- Tests vary depending on the network alignment:
- If there is an isolated network/vNIC that matches the VMs production network, all tests (Heartbeat, Ping, Script, Verification) are attempted
- If there is NO isolated network/vNIC matching the VM’s production network, only Heartbeat and Verification tests are attempted.
- Windows Firewall policies default to block ICMP on “Private” networks, which is how the new Isolated network will be identified. Adjust your policy or Ping tests will fail. The policy is File and Printer Sharing (Echo Request – ICMPv4-In) for the Private profile, double click on it and enable it, or use PowerShell:

Enable-NetFirewallRule -DisplayName "File and Printer Sharing (Echo Request - ICMPv4-In)"
- After you create the virtual lab, don’t forget to update the lab resources created to add Notes, Tags, and other standard meta-data you use internally.
- A SureBackup Job can use an Application Group, one or more Linked Jobs, or an Application group AND one or more Linked Jobs.
- When both are used, Linked Jobs are not processed until the Application Group tests are successful.
- Keep the application group running after the job completes is missing the word successfully. If the application group tests fail, I observed the group shutting down immediately.
- You will need to right click on the job and choose Stop Session when you are ready to shut down and delete the VMs.
- Email notifications only happen on failures; I see no exposed setting to send notifications on success.
- You cannot delete a lab or application group if a SureBackup job references it. Delete or edit the SureBackup job to remove the reference and try again.
- You can power on the proxy appliance outside of SureBackup and deploy your own VMs attached to the vSwitch and make sure they get DHCP and are reachable with masquerading.
- The default user/password for the proxy appliance is root/<proxyname>_r. Any spaces or underscores in the name are converted to hyphens. The default proxy name of Virtual Lab 1 results in the combination root / Virtual-Lab-1_r
- You can examine the NAT masquerade or static NAT rules on the appliance with the commands iptables -L -n -v && iptables -t nat -L -n -v
Summary
With a lot of reading and a little bit of work, we have created an Application Group, a Virtual Lab with a few networks, and a SureBackup job that can test restores in a private environment. Most of us will have bit more work to do to create additional networks and maybe additional labs, but you should be able to start testing at least a few backups immediately. We can go to sleep a little better tonight knowing that our backups AND restores work! Even if they don’t work for some reason, at least we will find out now, not when we need them most!
I would love to hear any other tips and tricks for using SureBackup. It appears very powerful, but requires a good bit of manual effort. Has anyone made strides in automating it, officially or unofficial? Let me know in the comments or on twitter. Thanks!

So thanks
i have installed veeam on a virtual machine and surebackup excellent work but now i want to install that on a physical server
is that your descriptions for veeam on virtual server or physical server ?
SureBackup requires a hypervisor to work. Other Veeam components can be installed on physical servers. You will need to look at the documentation, though, I do not have and do not plan to have any articles covering installation.
this is my scenario
can you help me plz ?
i am really confused my vm ip address is 172.20.68.74 (subnet=255.255.255.224 , gateway = 172.20.68.65) in vlan 682 and my veeam backup server is installed on physical server with ip address 172.20.68.221 (subnet=255.255.255.224 , gateway=172.20.68.193) now would you please say me in proxy step what Vlan do i have to select and what ip adress had to use this image ( https://pasteboard.co/HFwxFEo.jpg )
also in network setting this pic ( https://pasteboard.co/HFwymez.jpg )
what ip address and masquerade had to fill ?
You can place the lab in any network you want. It does NOT have to be the network the VM is originally from. You can choose from any network that has enough room and that the veeam console can communicate with.