Sometimes in the course of your work you’ll find that you need to move data between two datastores on your ESXi host or vCenter server. In my case, this occured twice, once when adding shared storage to my home lab and again when migrating some hosts from VC 5.1 to 5.5 at work. VM data is best moved via storage vMotions, but this may still leave a few files on your datastore, such as the ubiquitous ISOs folder. You could download the files from the datastore, save them on your client, and then upload them to the datastore. That’s fairly clunky, especially with the Web Client, but more importantly, it’s slow and tedious. There’s another way.
The answer is to use PowerCLI and a PSDrive. If you are not familiar with PSDrives, check out this article at the Hey, Scripting Guy! Blog for a primer. The most important command to remember is Get-PSDrive, as that will give you all the information you need to do this again in the future without having to reference this article. If you have PowerCLI installed, you will have a shortcut on your desktop for it. This will launch a window that looks like the command prompt. If you want a little more help as you drive (and you will!), I suggest using PowerShell ISE for tab completion and IntelliType. You can add the PowerCLI snapins with the following commands from the ISE:
if (! (Test-Path $profile)) {
    New-Item -path $profile -type file -force
}
'Add-PSSnapin VMware.VimAutomation.Core -ea "SilentlyContinue"
Add-PSSnapin VMware.VimAutomation.Vds -ea "SilentlyContinue"
Add-PSSnapin VMware.VimAutoation.License -ea "SilentlyContinue"
Add-PSSnapin VMware.DeployAutomation -ea "SilentlyContinue"
Add-PSSnapin VMware.ImageBuilder -ea "SilentlyContinue"
Add-PSSnapin VMware.VimAutomation.Cloud -ea "SilentlyContinue"' | Out-File -FilePath $profile -Append
notepad $profile
Verify the profile contents are correct (this should preserve existing profiles, but check for a newline before the new content). Restart ISE. It will take a little longer now, but you end up with tab completion AND PowerCLI.
Two caveats:
- Rescan for any datastores marked as inactive! Our process below will not ‘wake’ any sleeping datastores, it will just show as a 0 byte datastore. If you’re not sure, I suggest you rescan anyway.
- You cannot copy between two different VMhosts or vCenter servers. The single VMhost or vCenter server must see both datastores.
First, we need to connect to vCenter and/or the ESXi hosts. If both datastores are known to a single entity, just do this once. If each datastore is known to separate entities, such as one host managed by vCenter and the other not, you need to connect to both. The PowerCLI command is Connect-VIServer <hostname>. Enter your credentials when prompted.

(Note: All photos have some blurs for redacted information, if you need any clarity on the commands run, ask in the comments!)
Now we need to examine the PSDrives available to us with Get-PSDrive.
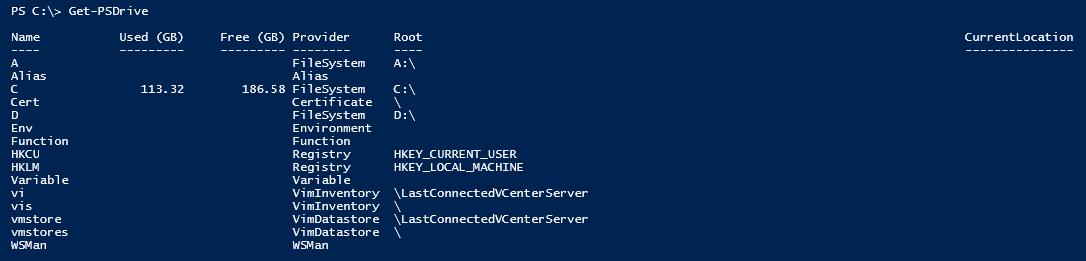
There are four special PSDrives from PowerCLI and the come in pairs: vi:/vis:, vmstore:/vmstores:. Note the colon on the end, it is part of the PSDrive name, not a delimiter. The singular version of each are for the last VIServer connected to; the plural version is for all connected VIServers. ‘vi/vis’ will show contents of each host, such a the VMs currently on it. The one we care about is ‘vmstore/vmstores’ which is where the datastore contents are. As we are restricted to a single VMhost or vCenter server, use ‘vmstore:’ You can manipulate each PSDrive with normal cd and dir commands. Cd into vmstore: and run dir and you will see your datacenters:
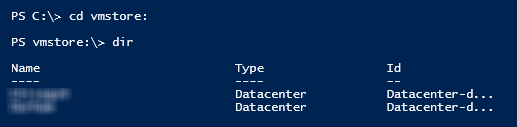
Your setup is going to wildly diverge from mine at this point. You will need to navigate through the directory structure of your datastores to find the source path and destination path. If you are using the ISE, then you have tab-completion, so this should be a little quicker. In my case, I have an entire datastore as the source of the ISOs, but on the second datastore I am creating a folder for the ISOs.
<FIG4>
The last step is to copy the files from the source to the destination with the copy command. Nothing special here:

Unfortunately, you get absolutely zero feedback. If you connect to the host another way (open a new ISE window/session, C# client, or Web Client) you can see files show up, but you just have to wait till you get a prompt back with a success or failure message. On the few instances where I needed to perform this, I ran the ISE session on an RDP server, so that my local connectivity had no potential to disrupt the transfer. A few minutes to hours later and your last few files have been migrated. Congratulations!
