I’m pretty excited about this post! I’ve been building up Puppet for vSphere Admins for a few years now but the final integration aspects between Puppet and vSphere/vCenter were always a little clunky and difficult to maintain without specific dedication to those integration components. Thanks to Puppet and VMware, that’s changed now.
Puppet announced version 2.0 of their Puppet Plugin for vRealize Automation this week. There’s a nice video attached, but there’s one problem – it’s centered on vRealize Automation (vRA) and I am working with vRealize Orchestrator (vRO)! vRO is included with all licenses of vCenter, whereas vRA is a separate product that costs extra, and even though vRA requires a vRO engine to perform a lot of its work, it abstracts a lot of the configuration and implementation details away that vRO-only users need to care about. This means that much of the vRA documentation and guides you find, for the Puppet plugin or otherwise, are always missing some of the important details needed to implement the same functionality – and sometimes won’t work at all if it relies on vRA functionality not available to us.
Don’t worry, though, the Puppet plugin DOES work with vRO! We’ll look at a few workflows to install, run, and remove puppet from nodes and then discuss how we can use them within larger customized workflows. You must already have an installed vRealize Orchestrator 7.x instance configured to talk to your vCenter instance. I’m using vRO 7.0.0 with vCenter 6.0. If you’re using a newer version, some of the dialogs I show may look a little different. If you’re still on vRO 6.x, the configuration will look a LOT different (you may have to do some research to find the equivalent functionality) but the workflow examples should be accurate.
Puppet provides a User Guide for use with a reference implementation. I’ll be mostly repeating Part 2 when installing and configuring, but reality tends to diverge from reference so we’ll explore some non-reference details as well.
Install the Puppet plugin
First, download the plugin. You’ll need a SolutionsExchange login to acquire it. Next, visit the vRO Control Center (URL: https://vro.example.com:8283/vco-controlcenter) and select Manage Plugins near the bottom. Click Browse… at the top, point it to the downloaded plugin, and click Install. Follow the prompts to restart the vRO instance. If you have any vRO Clients open, you MUST close them and re-open them after the restart, as the plugin adds new Types that are not loaded dynamically. You’ll just get weird errors when working with Puppet workflows until you re-launch the client.


Once you launch the client and login, go to the workflow tab, expand Library and you’ll find a new Puppet section you can expand with a few workflows in it. The ones with the arrow on them are the ones we’ll be looking at.

Add your Puppet Master
The first thing we need to do is add the master. This will create a Puppet type corresponding with our master that other plugins will leverage. This lets us set up a single set of credentials and interaction methods rather than repeating it in every workflow. We need to provide the hostname, IP, and ssh port. Then we need a user/pass that works via ssh and whether that user needs to use sudo. For most of us, this means we cannot use root, because we don’t permit root logins over the network (if you do, join us and change that setting; your auditing and compliance teams will thank you!).
The hostname is what both vRO and the clients will access – clients specifically in the curl <URL> | bash step – and you should ensure the hostname/ip provided is accessible from all network segments properly. You could add the same master with different display names and DNS/IP entries for agents who can’t reach the normal DNS/IP, but then vRO should be able to access it as well. I suspect you can fake things out by using “different” puppet masters for the install/purge workflows, maybe cloning and editing the workflows a bit, but that’s definitely not an optimal setup, so I recommend getting your network and firewall policy houses in order and doing things the suggested way.
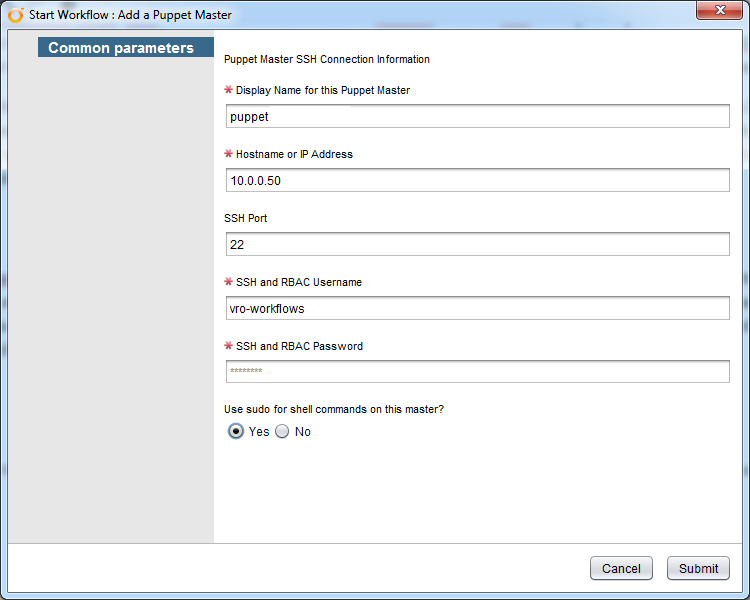
This means we need a non-privileged user and to enable sudo. I’ve chosen the username vro-workflows, but any will do. We need to add a single sudoers stanza for this user as well, vro-workflows ALL=NOPASSWD: /opt/puppetlabs/bin/puppet, /opt/puppetlabs/bin/facter, /bin/cp, /bin/kill. We can do this via puppet, of course. I use saz/sudo and added this sudo_conf hash via hiera to my puppet master. Make sure this config is applied before proceeding.
profile::base::linux::sudo_confs:
  vro-pe-workflows:
    priority: 10
    content: 'vro-workflows ALL=NOPASSWD: /opt/puppetlabs/bin/puppet, /opt/puppetlabs/bin/facter, /bin/cp, /bin/kill'
We need the NOPASSWD option because this will be running without a tty, which would otherwise generate askpass errors. I did not find comprehensive documentation on the commands that are required for the full set of workflows, but this should adequately cover the workflows Install PE Agent on Linux with SSH, Purge PE Agent Node, and Run Puppet on a Linux Node. If you find other commands that are required, let me know in the comments.
If you need to change anything, use the Update a Puppet Master workflow. It’s practically the same, except that it requires you select an existing master that will be edited.

The workflow description doesn’t say if this MUST be a Puppet Enterprise master or if it can be an Open Source master. I think it can be either from inspecting the workflow but haven’t verified.
Installing and Running the PE Agent
With a master in place, we can launch the workflow Install PE Agent on Linux with SSH (I imagine Windows is similar, but my focus has been Linux so far). This workflow installs PE and sends the certificate request to the master. It does not actually start the agent service or run puppet. We need to select the master and provide the hostname (or IP – it’s a string field) and ssh authentication information. I am running this against a freshly provisioned raw template with no additional users or a locked down ssh config (puppet handles that!) so root works in this case.
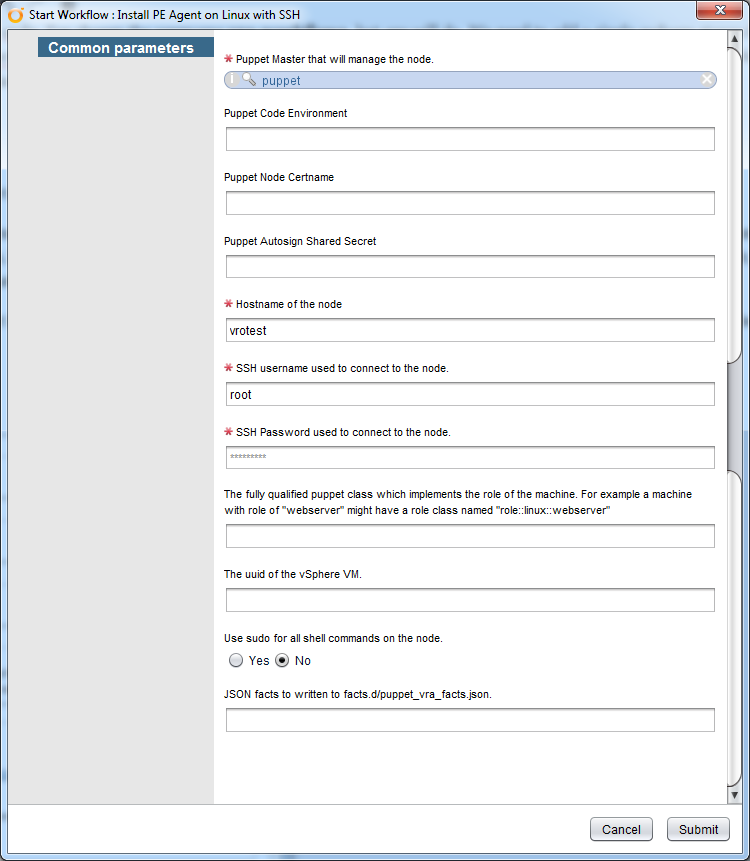
You can certainly provide the other fields if you need them. Do NOT select sudo if the user on the agent (not the master!) does not require sudo as that will generate errors. In the lab, I use autosigning by domain, but ideally using a shared secret here is more secure and something I will be looking at soon. Environment, certname, and role all come from my existing puppet classification, but could be useful if I need to override something. The JSON facts are great when I want to provide some custom fact during deployment, like datacenter=midwest that would help puppet classify the new node properly. I’m not sure why I’d want to use the uuid when I have the hostname, though, that one has me baffled.
If all goes well, you’ll see this show up in the Schema tab on the right hand:

It took me a while to get this workflow to execute properly. While I hope I explained all the caveats I encountered, if it’s still not working for you and the log isn’t helpful, click the arrow to the right of Info and change it to Debug, the extra detail should be helpful. For additional information, look at syslog from the agent or master to see what went wrong. /var/log/secure will show any sudo authorization errors.
This workflow ONLY installs Puppet Enterprise from a PE master. If you’re using Puppet Open Source, the client must be installed another way. The good news is that you can install the AIO puppet agent on your templates, so it’s ready for use when a new VM is provisioned from the template, obviating the need for this workflow and step entirely.
With the agent installed, you can now use the workflow Run Puppet on a Linux Node. We just need hostname/ip, ssh authentication on the agent, and the sudo flag. Since the node hasn’t run puppet yet, I can still use root. Again, sudo enabled for a user who does not require it will just generate errors.

The Schema for this is a little larger but should eventually end on the green circle below Start service. Again, use Debug logs or agent/master syslogs if it doesn’t just work.

Purging a node
Finally, we need to be able to clean up after ourselves and purge the agent’s certificate when it’s ready to be decommissioned. We don’t need to remove puppet from the node itself, as a decommissioned VM will be destroyed shortly. This workflow is very simple and just requires the puppet master and the certificate name to be removed. In my case, the certificate name is the hostname plus the domain; others may use different certificates. Just be sure it matches EXACTLY what the puppet master knows.

This is another simple schema, but it was the most difficult one for me to troubleshoot. Turning on Debug logs here let me see the sudo commands that were failing on the master and determine what my sudoers config should be. Hopefully I’ve made it really easy for you, though!
I am not sure if this would work on an Opensource master. If it doesn’t work out of the box, you could probably clone the workflow and edit the scriptable task to remove any PE-specific commands. Something to explore another day.

Summary
We took a quick trip through installation and configuration of the Puppet plugin for VRA, but with vRO. We then looked at managing the puppet master object in vRO, installing and running puppet on a Linux agent, and purging the certificate from the master.
The next step is to plug these workflows into your provisioning workflows, tying the attributes of the provisioning workflow to the inputs for each of these steps so it just flows with minimal user input. I’ve been working on that but it’s not complete, and I’m still investigating how to get the workflows out of vRO directly rather than providing GUI-oriented instructions. Stay tuned!

Rob, great walkthrough! Thanks for sharing.
You can find our reference implementation code here:
https://github.com/puppetlabs/puppet-vro-starter_content
There is an example user (vro-plugin-user) that gets set up and we have the SSH and sudoer’s configs we used on the master for it here:
https://github.com/puppetlabs/puppet-vro-starter_content/blob/production/modules/vro_plugin_sshd/manifests/init.pp
https://github.com/puppetlabs/puppet-vro-starter_content/blob/production/modules/vro_plugin_user/templates/vro_sudoer_file.epp