Over the past three years, my Puppet for vSphere Admins series has meandered through a number of topics, mostly involved on the Puppet side and somewhat light on the vSphere side. That changed a bit with my article Make the Puppet vRealize Automation plugin work with vRealize Orchestrator, describing how to use the plugin’s built-in workflows to perform some actions on your VMs. However, you had to invoke the workflows one by one, and they only worked on existing VMs. That is not good enough for automation! Today, we will start to look at how to integrate the Puppet Enterprise plugin into other workflows to provide end-to-end lifecycle management for your VMs.
What is the lifecycle of a VM? This can vary quite a bit, so the lifecycle we will work with today is made to be generic enough for everyone to use, but flexible enough that everyone can expand on it. It consists of:
- Provisioning
- Updating ancillary systems prior to VM creation (IPAM, DNS, etc)
- Deploying a Virtual Machine
- Installing Puppet Enterprise on the VM
- Using Puppet Enterprise to provision services on and configure the VM
- Add the new VM to a vCenter tag-based backup system
- Decommission
- Delete the VM (removes from backups)
- Purge the record from PE
- Update ancillary systems after VM removal (IPAM, DNS, etc)
My hope is that the workflow ideas here are sufficient to get you started in your environment and that they inspire you to increase the automation over time. We need to set up vRealize Orchestrator, import the workflows, configure them, and possibly customize them. At the end, we’ll show the result of the Provisioning workflow to prove that it works!
I don’t use vRealize Automation, vRO’s older sibling. I imagine the same general concepts work there with blueprints, though I know it won’t translate directly. If you use vRA and have some suggestions to share with other readers, please let me know in a comment!
vRealize Orchestrator is a really complex program all on its own and isn’t the focus here, so I’m going to focus on the workflows and skim over using the vRO client for the most part. There is plenty of product documentation and other vRO-oriented blogs out there that I encourage you to avail yourself of as needed. I hope this isn’t too high level, but if it is, let me know in the comments and I will address it!
Setting up vRealize Orchestrator
I’ve created a repository with sample workflows at rnelson0/vro-pe-workflows. You can download the entire bundle here. Since they will evolve over time, you may find some discrepancies between this article and the latest workflows. I do not think it will drift so much as to be unrecognizable, but when in doubt, consider the repository the authoritative source.
Before you look at the workflows, make sure you have installed the puppet plugin itself, run the Add a Puppet Master workflow, and, if you want to keep the Tag portion of the workflow described below, install the tag API package. If you need some direction on this, we covered the process in the previous article.
Now you can expand the downloaded zip file and import the workflows as suggested in the README. You’re going to have to do some minimal configuration of the workflows to fit your environment, also documented in the README. But before making any changes, let’s examine the workflows to see how they work and what you want to change.
Workflows
Randomly select Datastore from Datastore Cluster
This simple workflow exists for one reason: you have to deploy a VM on a VC:Datastore object. If you use Datastore Clusters, the Web Client will choose an individual Datastore for you. No such luck in vRO, Datastore Clusters are the type VC:StoragePod. If you choose a Datastore Cluster during provisioning, this randomly selects and returns one of the cluster members. It is boring but necessary. I did not find a built-in workflow that performs this work, but would love to swap it out if someone is aware of one.
Linux VM provisioning checklist
In most environments, there are things we need to have set up before we perform the VM provisioning process – the ancillary systems described in our lifecycle. We probably need an IP assignment (either static or adding a DHCP reservation), a DNS entry, and maybe a firewall policy. We probably want to ensure that we cleanup any previous usage of the hostname or IP so there aren’t any conflicts. That’s what this workflow is for. Because I have no idea what your environment uses, this is quite literally just a checklist. If you don’t say Yes to everything, it fails.

The schema for this workflow is pretty simple as well:

The User interaction displays the checklist and the first Scriptable task checks to see if everything is true. If so, it moves on to the final Scriptable task, which simply logs success, before completing; otherwise it ends by throwing an exception. We use this checklist later as a pre-flight check. If we receive the exception (the user said No to at least one item), we bail, otherwise we continue provisioning the VM.
This is an area you probably want to customize. Maybe you don’t care about some of the questions, or you’ve already automated those portions, or all of the items. Great. You can remove any unnecessary questions, or even the whole workflow, and just connect to the existing vRO workflow for the automated portions. We’ll see exactly where this gets plugged in shortly.
Simplified Linux
Next up is Simplified Linux. This is a wrapper around the default vRO workflow Clone, Linux with single NIC. It doesn’t accomplish anything different than that workflow, but it allows us to provide common values to the workflow so we don’t have to provide 100% of the inputs required to complete it. It also lets us convert a Datastore Cluster choice into a usable Datastore and input that to the Clone workflow. You probably won’t run this directly, so we’ll skip the input screen. Here’s the schema:
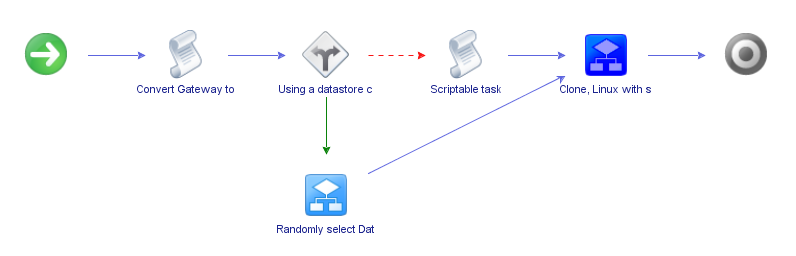
You’ll also notice the scriptable task called Convert Gateway to String – this just massages the IP address you provide into the correct object format that Clone expects. After that, it randomly selects a datastore from a cluster or uses the specific individual datastore provide before feeding all of your choices as inputs to Clone. That workflow has its own error conditions that may fail, but this workflow itself only has a success path.
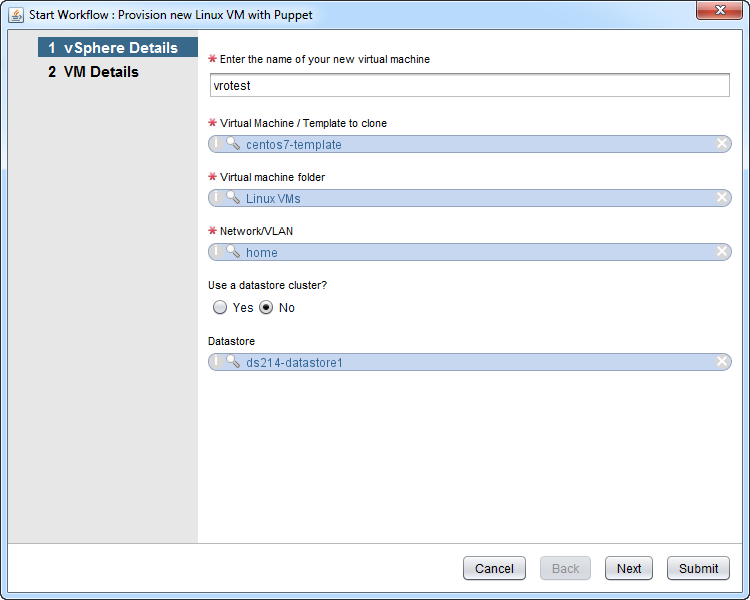
Provision new Linux VM with Puppet
Alright, here’s the workflow that does all the heavy lifting. This is the one you will call directly when you create a new VM. It will prompt you for some information about the VM you want to create, then get to work. Out the other end comes a working VM that’s managed by Puppet, including completing the first run. If you’re classifying your nodes properly, this means the VM is 100% ready to go! Here’s the interface:

Here’s the schema that we can walk through, as well as logs from a test run-through:
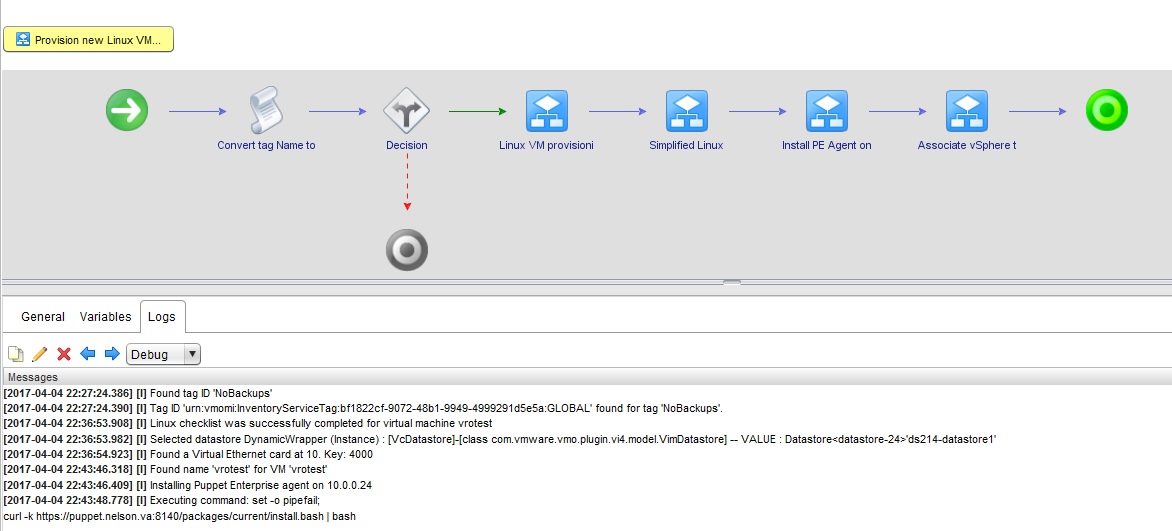
There’s a lot that may need customized here. I mentioned tagging earlier. I use a tag-based backup system. If you don’t care about tags, you can rip the Convert tag Name to ID, Decision, and Associate vSphere tag to VM steps out of the schema. Next is the Linux VM provisioning checklist workflow. As I described earlier, you may be making edits around this. If any of your ancillary systems are automated, remove the checklist items (update the scriptable tasks, not just the input) and insert the automation steps AFTER this workflow step. If you insert it before, you could create an IP reservation only to have your workflow bail if someone says No to an item.
If you pass the checklist, or whatever workflow components you replace that with, it moves on to the Simplified Linux workflow. The answers you provided up front get input to that workflow so you are not prompted for anything at this time. Once the workflow completes, you move on to the Install PE Agent on Linux with SSH. The vRO server initiates an SSH connection to the new VM and then runs the curl | bash installer on the node (visible in the logs in this figure) and has the master sign the agent certificate. The first puppet run starts as well. This means the workflow step will require enough time to install PE and perform the first agent check-in. This could be very long for some nodes.
If there are other things you want to automate, you can insert their tasks or workflows before the End Workflow object. Alternatively, you can integrate this workflow inside other workflows, whichever works best for you.
Decommission VM
The final workflow is Decommission VM. This is essentially the reverse of the Provision workflow. It prompts you for a VM name, then asks you a few questions about non-automated cleanup items similar to the provisioning checklist, then purges a puppetized VM from the master (puppet purge <node>) and finally, deletes the VM.
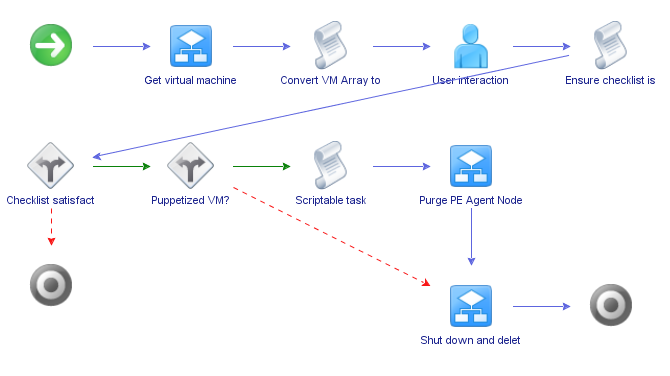
To customize the decommission checklist, edit the User interaction step. Add or remove whatever items you require. If you have additional automated decom steps, add them after the Checklist satisfactory? decision item. Otherwise, you shouldn’t have to touch this one.
Putting it all together
With the workflows imported and configured for your environment’s particulars, there’s a few more customizations required, documented in the README. You need to populate the Puppet Master object in some workflows and select a few other items from your vRO instance. You should set default values like DNS and domain names, but you still get the chance to change most of these values when you run the workflows. Once that’s configured, you can run the Provisioning workflow and you should end up with a new VM that’s managed by your Puppet Enterprise master. Here’s the result of my workflow test that I started above:

All I had to do was fire up the vRO client, run this workflow, and in about 20 minutes (I have really slow storage) the VM was there and ready to rock and roll! When I was done with it, I just ran the Decommission workflow and within a minute, the VM was gone and purged from PE!
Summary
This is a first draft at providing lifecycle workflows for VMs using Puppet Enterprise. In addition to the customization most environments will require, I’m sure the workflows can be improved with better error detection. I’m not as familiar with that in vRO as I’d like to be, but I know I can add that later; no need to hold up a good thing waiting for perfection. I also have to fire up the vRO client to use this, which isn’t fun. I will be looking at enabling that through a web front end eventually.
I am already seeing some benefit using these workflows right now. I’m human, like most of you reading this, so I forget things once in a while. vRO doesn’t. Between the checklist and the automation, I can’t simply forget about a step in the provisioning lifecycle. I might tag VMs incorrectly for backups, but I am forced to provide some tag or I can’t provision my VM. As long as I use my workflow, I’ll never have another VM that isn’t in the backup system. That’s pretty awesome. I am very glad to have these workflows helping me out while I am working to improve them.
Remember, this is a set of example workflows for end-to-end provisioning, and it is really unlikely that you can just drop them into your environment without at least some configuration. Don’t be afraid if you need to poke at it for a bit. However, I hope you can either download and customize these workflows, or use them to inform your own workflow development for end-to-end provisioning with Puppet Enterprise!

One thought on “vRealize Orchestrator Workflows for Puppet Enterprise”