Welcome back to our Puppet series. I apologize for the extended hiatus and thank you for sticking around! As an added bonus, in addition to inlining files, I’m including links to the corresponding files and commits in my PuppetInABox project so you can easily review the files and browse around as needed. I hope this is helpful!
Today, we will look at improving our build server. The build role is a centralized server where we can do our software development, including work on our puppet code and creating packages with FPM. When we work with git, we have to run git branch to see what branch we’re in. If you’re like me, this has led to a few uses of git stash and in some cases having to redo the work entirely once you start committing on the long branch. To help, we’re going to add the currently-active branch name of any git directory we are in to the PS1 prompt. We also are doing a lot of edits of *.pp files and we don’t have any syntax highlighting or auto-indenting going on. We can fix that with a few modifications, and we’ll discuss where additional customizations can be made.
A build server is extremely useful for me for three reasons. First, I have a laptop running Windows and I’m not particularly enamored of the available git tools and editors on it. Second, I have some VM servers and, aside from making them pay for themselves, it’s nice to have a VM I can reach from any machine anywhere in the world. I have access to the same tools no matter where I am. Third, as the settings are enabled at a global level, all new users have the same base profile. We don’t need to modify our puppet code or data just because someone joined or left the user list. Same thing if we rebuild the build server.
For others, a central server may not be as important as you perform your work on a local machine. Though the examples in this article are aimed at system-wide settings, you could also apply those settings to your local machine at the system level, tweak them slightly to apply to only your profile, or combine the changes into rc files and deploy them that way.
Choose whichever approach best suits you and your organization. I’ll focus on the build server and point out where changes are required for individual users.
Bash Prompt
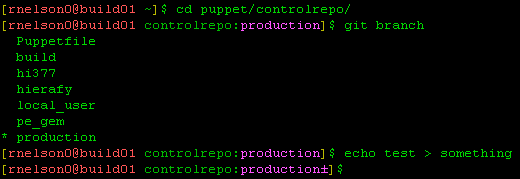
Here’s our boring old bash prompt. Note that I’m using a green monochrome theme in putty, I’m not actually specifying any colors in my bash configuration:

What can we say about it? …it works? It’s difficult to be enthusiastic for it. It might look better with a little color and important information about our git branch.
Wow, that is so much better! The color alone is great. In addition, we see the branch name when we’re in a git-enabled directory, and just our regular prompt when we’re not. If we make any changes to the data in the repo, the prompt includes a little notification icon. Pretty sweet!
There are a number of ways to accomplish this. We will use two resources, one file and one file_line. The file bashrc.puppet is a bunch of color settings plus the PS1 value. The file_line will ensure that the file is called in the /etc/skel/.bashrc that new users receive (existing users will need to see the Roll section for additional instructions). We’ll call this class profile::rcfiles::bash. Since we’re big on test-driven development, let’s create an rspec file before we do anything else.
$ cat dist/profile/spec/classes/rcfiles/bash_spec.rb
require 'spec_helper'
describe 'profile::rcfiles::bash', :type => :class do
  context 'with defaults for all parameters' do
    it { is_expected.to create_class('profile::rcfiles::bash') }

    it { is_expected.to create_file('/etc/bashrc.puppet') }
    it { is_expected.to create_file_line('bashrc_skel_puppet_source') }
  end
end
This is very simple and of course all tests will fail since we haven’t coded anything yet. Let’s turn to the class definition:
$ cat dist/profile/manifests/rcfiles/bash.pp
class profile::rcfiles::bash {
  file { '/etc/bashrc.puppet':
    ensure  => file,
    path    => '/etc/bashrc.puppet',
    source  => 'puppet:///modules/profile/bashrc.puppet',
  }

  file_line {'bashrc_skel_puppet_source':
    ensure   => present,
    path     => '/etc/skel/.bashrc',
    line     => '[[ -f /etc/bashrc.puppet ]] && source /etc/bashrc.puppet',
    after    => '# .bashrc',
  }
}
We’ll look at the content that will go in /etc/bashrc.puppet in a moment. The file_line adds [[ -f /etc/bashrc.puppet ]] && source /etc/bashrc.puppet to /etc/skel/.bashrc. When our new file exists, any bash instantiation that reads .bashrc will parse and execute the contents of the file. Even though Puppet will ensure our file always exists, it’s a good idea to wrap any source command with a file existence test. We could decide at some point in the future to remove /etc/.bashrc.puppet, maybe replacing it with something better, and this test would prevent everyone from seeing an error about the file not existing on every login.
Here are the file contents:
$ cat dist/profile/files/bashrc.puppet
# NOTE: This file is managed by Puppet; any changes you make will be erased.

# Reset
Color_Off='\e[0m'       # Text Reset

# Regular Colors
Black='\e[0;30m'        # Black
Red='\e[0;31m'          # Red
Green='\e[0;32m'        # Green
Yellow='\e[0;33m'       # Yellow
Blue='\e[0;34m'         # Blue
Purple='\e[0;35m'       # Purple
Cyan='\e[0;36m'         # Cyan
White='\e[0;37m'        # White

# Bold
BBlack='\e[1;30m'       # Black
BRed='\e[1;31m'         # Red
BGreen='\e[1;32m'       # Green
BYellow='\e[1;33m'      # Yellow
BBlue='\e[1;34m'        # Blue
BPurple='\e[1;35m'      # Purple
BCyan='\e[1;36m'        # Cyan
BWhite='\e[1;37m'       # White

# Underline
UBlack='\e[4;30m'       # Black
URed='\e[4;31m'         # Red
UGreen='\e[4;32m'       # Green
UYellow='\e[4;33m'      # Yellow
UBlue='\e[4;34m'        # Blue
UPurple='\e[4;35m'      # Purple
UCyan='\e[4;36m'        # Cyan
UWhite='\e[4;37m'       # White

# Background
On_Black='\e[40m'       # Black
On_Red='\e[41m'         # Red
On_Green='\e[42m'       # Green
On_Yellow='\e[43m'      # Yellow
On_Blue='\e[44m'        # Blue
On_Purple='\e[45m'      # Purple
On_Cyan='\e[46m'        # Cyan
On_White='\e[47m'       # White

# High Intensity
IBlack='\e[0;90m'       # Black
IRed='\e[0;91m'         # Red
IGreen='\e[0;92m'       # Green
IYellow='\e[0;93m'      # Yellow
IBlue='\e[0;94m'        # Blue
IPurple='\e[0;95m'      # Purple
ICyan='\e[0;96m'        # Cyan
IWhite='\e[0;97m'       # White

# Bold High Intensity
BIBlack='\e[1;90m'      # Black
BIRed='\e[1;91m'        # Red
BIGreen='\e[1;92m'      # Green
BIYellow='\e[1;93m'     # Yellow
BIBlue='\e[1;94m'       # Blue
BIPurple='\e[1;95m'     # Purple
BICyan='\e[1;96m'       # Cyan
BIWhite='\e[1;97m'      # White

# High Intensity backgrounds
On_IBlack='\e[0;100m'   # Black
On_IRed='\e[0;101m'     # Red
On_IGreen='\e[0;102m'   # Green
On_IYellow='\e[0;103m'  # Yellow
On_IBlue='\e[0;104m'    # Blue
On_IPurple='\e[0;105m'  # Purple
On_ICyan='\e[0;106m'    # Cyan
On_IWhite='\e[0;107m'   # White

function is_on_git() {
  git rev-parse 2> /dev/null
}

function parse_git_dirty() {
  [[ $(git status 2> /dev/null | tail -n1) != *"working directory clean"* ]] && echo "±"
}

function parse_git_branch() {
  git branch --no-color 2> /dev/null | sed -e '/^[^*]/d' -e "s/* \(.*\)/\1$(parse_git_dirty)/"
}
export PS1="\[${Yellow}\][\[${IRed}\]\u@\h \[${Green}\]\W\$(is_on_git && [[ -n \$(git branch 2> /dev/null) ]] && echo \":\")\[${IPurple}\]\$(parse_git_branch)\[${Color_Off}\]\[${Yellow}\]]\[${Color_Off}\]$ "

# If not running interactively, do not do anything
[[ $- != *i* ]] && return
At the top, we note the file is managed by puppet. This is recommended, even in “immutable infrastructure” environments, to prevent anyone from making a change that will be overwritten and as verification that Puppet is correctly managing the file. Lines 3-74 define the colors. There are numerous ways to set colors and I settled on the ANSI escape sequences because they just work and I’m already familiar with them (brings me back to my BBS days!). Tput is another good option.
There are a few functions on lines 76-86 before PS1 is set. The function is_on_git() checks to see if the current directory is part of a git repository and if so, parses the branch name and checks to see if it should add a ± on the end if the working environment is dirty.
If you’re doing this in a shared environment, take the time to run this by your coworkers. Everyone has different terminal settings and many people have some form of color-blindness. And, someones what’s good for you make someone else want to stab their eyes out. Com to a consensus before setting the standard. Your bashrc.puppet file will probably look different than mine.
There is a LOT more you can do with a bash prompt. The Return Value Visualization idea appeals to me, for instance. Keep in mind that this is system level, however, you don’t want to go overboard. It’s fairly reasonable to provide everyone with a git-friendly PS1, the rest might be too much and you’d force users to undo it. I think it’s best to have a simple bass people can add to, rather than a complex base they can remove from.
No matter how much everyone agreed on the colors and prompt, someone will dislike the colors or want to customize the PS1 script more. They just need to copy the PS1 statement, tweak as needed, and add it at the bottom of their .bashrc file (or at least after bashrc.puppet is sourced). They’ll still be able to use the named color variables, of course:
export PS1="\[${Red}\][\[${IRed}\]\u@\h \[${Blue}\]\W\$(is_on_git && [[ -n \$(git branch 2> /dev/null) ]] && echo \":\")\[${IPurple}\]\$(parse_git_branch)\[${Color_Off}\]\[${Red}\]]\[${Color_Off}\]$ "
This step should be performed after the profile is applied to the build server, which we’ll cover a bit further on.
Vim
The next thing we want to do is improve our experience with editing puppet *.pp files. We have a git pre-commit hook that does syntax checks and may frequently complain about poor indent style, because by default we don’t get indenting with *.pp files. Vim also does not have contextual awareness of the puppet code, so closing braces are not auto-unindented and we don’t get keyword support. Then there’s the entire lack of syntax highlighting, which helps you catch open-ended strings, improper use of keywords, etc., and just makes it easier to read.
We’re going to fix that using Tim Sharpe’s (rodjek) vim-puppet repository along with a few global vimrc statements. There are other vim plugins for puppet (A google search turned up puppet-vim, puppet-syntax-vim, and a slew of other .dotfile style repos, plus 15 forge modules for vim), each of which does something slightly different than the rest. If you prefer a different plugin, just substitute it as the source below.
As always, we start with some rspec tests. The minimal CentOS install provides a basic vi-compatible vim and we need to add the package vim-enhanced to use these plugins. We need to pull in a vcsrepo and put it in a shared location that all users can see (/usr/share/vim/puppet). In addition, we have three file_line resources to add global settings in /etc/vimrc to make the most of everything. If you have other global settings you care about, add as needed. Again, make it easy for your users to add to the base profile, don’t require them to strip away the base profile if you can. Here’s the rspec file:
$ cat dist/profile/spec/classes/rcfiles/vim_spec.rb
require 'spec_helper'
describe 'profile::rcfiles::vim', :type => :class do
  context 'with defaults for all parameters' do
    it { is_expected.to create_class('profile::rcfiles::vim') }

    it { is_expected.to contain_package('vim-enhanced') }
    it { is_expected.to contain_vcsrepo('/usr/share/vim/puppet') }
    it { is_expected.to contain_file_line('vimrc_runtimepath') }
    it { is_expected.to contain_file_line('vimrc_indent') }
    it { is_expected.to contain_file_line('vimrc_shiftwidth') }
  end
end
Nothing special here, so let’s look at the class definition:
$ cat dist/profile/manifests/rcfiles/vim.pp
class profile::rcfiles::vim {
  package {'vim-enhanced':
    ensure   => present,
  } ->
  vcsrepo {'/usr/share/vim/puppet':
    ensure   => present,
    provider => git,
    source   => 'https://github.com/rodjek/vim-puppet.git',
  } ->
  file_line {'vimrc_runtimepath':
    ensure   => present,
    path     => '/etc/vimrc',
    line     => 'set runtimepath+=/usr/share/vim/puppet',
    after    => 'set nocompatible',
  } ->
  file_line {'vimrc_indent':
    ensure   => present,
    path     => '/etc/vimrc',
    line     => 'filetype plugin indent on',
    after    => '/usr/share/vim/puppet',
  } ->
  file_line {'vimrc_shiftwidth':
    ensure => present,
    path   => '/etc/vimrc',
    line   => 'set shiftwidth=2',
    after  => 'filetype plugin indent on',
  }
}
The vcsrepo resource type is not one we have used before. When only the title, ensure, and provider attributes are provided, the resource manages a local respository. We want to clone a repository, so we add the optional source attribute. This will clone the HEAD of the provided repository into /usr/share/vim/puppet (the vim-common package helpfully creates /usr/share/vim for us). You may set the attribute revision to a branch name, commit hash, or tag.
The three file_line resources ensure that /etc/vimrc contain these statements. I’ve added comments to explain their purpose:
set runtimepath+=/usr/share/vim/puppet  # Add the files provided by vim-puppet to the list of directories to search
filetype plugin indent on               # Ensure file-based indent is usedby searching runtimepath for 'indent' directories
set shiftwidth=2                        # How many columns text is indented
The after attributes for each file_line are somewhat arbitrary, except that the runtimepath statement must be before the filetype statement. I chose these anchors, plus the ordering of the resources themselves, and tested them to ensure that new build servers always end up with the correct statements in the correct order. If you’re not using CentOS 6 or have otherwised customized your systems’ /etc/vimrc, you may need to choose and test different anchors.
As mentioned earlier, these settings are implemented system-wide. You could just as easily deploy this on a per user basis, either by changing the target for the vcsrepo to your own home directory and the path for each fileline to $HOME/.vimrc. You may also use a plugin manager like vim-pathogen, which would require this be installed on a per-user level and stanzas added per-user to the .vimrc file. If you pursue this path, you may be interested in huskycode/vim, which provides some types for vim::plugin to install pathogen plugins and vim::rc for personalized settings (newer readme here).
I am unaware of a way to install vim-pathogen at a system level. If you are aware of a method, please let me know in comments or on twitter!
Word of warning: if you have external users, such as from Active Directory, puppet may determine the user exists but will not properly managehome for the user until the user logs in at least once. This would result in failures for the vim resources until that user logs in. These errors would be harmless, but will clutter up reporting. This is another reason I chose the system-wide settings, as our users come from AD.
With this in place, we are almost able to edit puppet code and get all the syntax highlighting and auto-indenting we’re used to seeing with other files.
Role Update
The last little bit is to update the build role. All we need to do is add the two new profile classes.
$ cat dist/role/manifest/build.pp
class role::build {
  include ::profile::base  # All roles should have the base profile
  include ::profile::build
  include ::profile::rvm
  include ::profile::rcfiles::vim
  include ::profile::rcfiles::bash
}
Voila! Once you run through the commit/push/r10k/agent workflow, your build server is updated. There’s one more thing to fix. Log out and log back in to the server and you’ll notice the same old boring prompt. If you edit a .pp file, though, that works just fine. To fix the prompt, do one of three things.
- If a user is brand new and hasn’t done anything yet, as root delete the user’s home directory. E.g. for rnelson0: rm -fR ~rnelson0
- If you have not edited your .bashrc, run: cp /etc/skel/.bashrc ~/.bashrc
- If you have edited your .bashrc, add this line at the top: [[ -f /etc/bashrc.puppet ]] && source /etc/bashrc.puppet
Log out and back in and you’ll see the wonderful new prompt. Cd into any directory holding a git repo, puppet or otherwise, and you’ll get the branch name and the dirty indicator when needed. Once all the existing users repeat this process – or build a new server and transfer everyone over to it – everyone benefits. New users will get everything when they log in for the first time.
Summary
We’ve been doing a lot of editing puppet code now and those using the build server have had to deal with bad alignment or poor/non-existent syntax highlighting when reading and writing code and maybe caused or been affected by a git-astrophe when someone was not aware of what git branch they are making changes to. No more! We have a helpful PS1 prompt that we have to consciously ignore if we want to create a git-astrophe. When we use vim to edit .pp files, the syntax highlighting is great and auto-indents work, vastly improving write- and readability of our code. You can customize and enhance the settings till it’s right for your team. Writing puppet code should be a whole lot easier now!
